


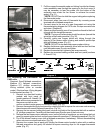

2-4 SETTING-UP
**WARNING:
Locate your holding cabinet in an area where the doors can be opened without impeding your operation and
where loading and unloading product will be easy.
A clearance of at least four (4) inches is required between the top of full size units (models
beginning with CA70) and any other equipment or surfaces to allow air to circulate to the motor air vents. Do not
set anything on top of these units.
Proper operation of the unit requires that it be level and that it be plugged into a separate electrical line
protected by a fuse or circuit breaker of the proper rating.
CA70-CV16 120V/1500W/14.3A CA43-CV7 120V/1500W/14.3A
CA70-CV16HW 120V/2000W/18.5A CA43-CV7HW 120V/2000W/17.0A
CA70-CV32 120V/1500W/14.3A CA43-CV13 120V/1500W/14.3A
CA70-CV32HW 120V/2000W/18.5A CA43-CV13HW 120V/2000W/17.0A
CA70-CVMP12 120V/2000WI18.5A CA43-CVMP6 120V/2000W/17.0A
CA70-CVMP15 120V/2000W/18.5A CA43-CVMP7 120V/2000W/17.0A
WARNING:
2-5 CLEANING
**NOTE:
CAUTION:
**NOTE:
**NOTE:
**NOTE:
Plug your unit only .into a grounded receptacle of the correct
voltage. Check the serial number label located in the top right front corner
on the right side of the cabinet to determine your unit's electrical rating.
Never use steel wool or caustic cleaning compounds on your
BEVLES holding cabinet.
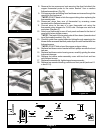
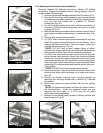
1. Push power switch to the OFF position.
2. Unplug power cord from wall.
Always unplug the unit before dismantling or cleaning.
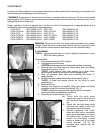
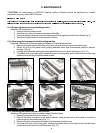
3. Remove front and back doors by lifting entire door and sliding
hinge off of hinge pins. 1)
Avoid motions other than straight up or down when
removing and replacing doors so as not to damage hinges.
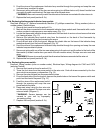
4. Slide out stainless steel water pan containing the three "U"
shaped baffles.
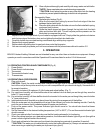
5. Lift off the heating module from the top of the cabinet.
At least two people should do the lifting to avoid
possible injury.
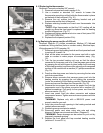
6. Remove all trays.
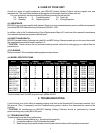
7. Remove tray supports by carefully lifting each panel and tilting
the bottom toward the center of the cabinet. 3)
Handle the support panels carefully as any damage or
bending will make reinstallation very difficult
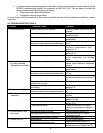
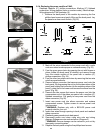
8. Remove positive door latches 4):
8a. Firmly hold the latch plate
against the edge of the door and
pull the black capped pin up and
out.
8b. Slowly pull the latch plate away
from the door, ready to catch the
flat metal spring as it releases.
9. Models equipped with dutch
doors will also have a removable
wiper blade attached to the top of
the bottom door. To remove this,
loosen the two black knurled
knobs at either end of the wiper
blade retainer. Lift off the
stainless steel retainer and the
wiper blade.
Cleaning Steps:
(Fig.
(Fig.2)
(Fig.
(Fig.
Figure 1
Figure 2
Figure 3
Figure 4