


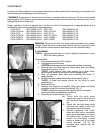
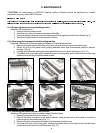


Figure 5
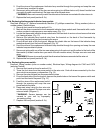
10. Clean all pieces thoroughly and carefully with soapy water and soft cloths.
Neverusesteelwoolorcausticcleaningcompounds.
Avoid splashing water or any other liquid into the heating
module to prevent possible damage to electrical components.
**NOTE:
**CAUTION:
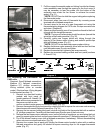
Reassembly Steps:
1. Replace door latches ):
1a. Wrap the flat metal latch spring lip around the front edge of the door
between the two latch butts.
1b. Place the latch plate with the flat side out over the flat metal latch spring
and press firmly in place.
1c. Guide the black capped pin down through the top latch butt, the latch
plate and bottom latch butt. This will require positive pressure on the
(Fig.5
latch plate to compress the spring.
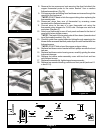
2. Replace dutch door wiper blade if your model is equipped with one. Simply slide the gasket and retainer
onto the top edge of the bottom door and re-tighten the two black knurled knobs.
3. Carefully replace top mounted heating module and align with top tray supports.
4. Replace tray support panels.
5. Replace doors by sliding door hinges back down onto the hinge pins.
6. You are now ready to operate your unit in accordance with the procedures outlined in section 3-2.
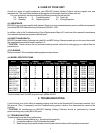
3. OPERATION
BEVLES Heated Holding Cabinets are not intended for any use other than as foodservice equipment. Always
operate your unit in accordance with the Operational Procedures listed in section 3-2 of this manual.
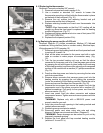
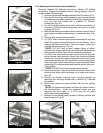
1. Power Switch
2. Power Switch Indicator lamp
3. Thermostat
4. Thermostat Indicator Lamp
5. Thermometer
1. Plug unit into wall.
Check the serial number label located on the right side of the cabinet (as you are facing the
front of the unit) at the top to be sure that your unit is compatible with your electrical supply. See section 4-4
for more information.
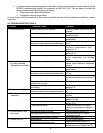
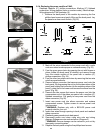
2. If humidity is desired, fill water pan % full of water and adjust baffles.
2a. For maximum humidity, all three baffles should be inserted into the water pan as though they were the
letter "U" (open side up).
2b. For minimum humidity, all three baffles should be inserted in the water pan as though they were the letter
"n" (open side down).
2c. Intermediate levels of humidity may be achieved by mixing the arrangement of the baffles.
3. Slide the water pan into its receptacle at the top of the cabinet, just under the heating module. Carefully
push the pan to assure that it is seated against the water pan back stop.
4. Push on the power switch. The power indicator light should come on. You should also hear the blower
fan(s) operating.
5. Set the thermostat to the desired holding temperature (140° to 200°F). The red thermostat indicator light
should come on.
6. Check your cabinet after 5 minutes to be sure that the heating element(s) is functioning.
7. When the cabinet reaches your desired temperature, the thermostat indicator light will go out (though the
power indicator light will remain illuminated).
8. Check and add water to the water pan from time to time during long periods of operation (if needed).
: The water pan is located directly under the heating element(s). Always use extreme caution
when removing or replacing the water pan to prevent injury (burn).
3.1 OPERATING CONTROLSAND COMPONENTS
3-2 OPERATIONALPROCEDURES
CAUTION:
**CAUTION
(Fig. 6)
(Fig. 7)
Figure 6
Figure 7