


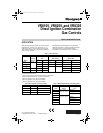


VR8105, VR8205, AND VR8305 DIRECT IGNITION COMBINATION GAS CONTROLS
69-1226—2 4
CAUTION
Equipment Damage.
Can burn out valve coil terminals.
Never apply a jumper across (or short) the valve
coil terminals, even temporarily.
Follow the appliance manufacturers instructions if
available; otherwise use these instructions as a guide.
IMPORTANT
These gas controls are shipped with protective
seals over the inlet and outlet tappings. Do not
remove the seals until ready to install adapters
or connect the piping.
Converting Gas Control from Natural Gas
to LP Gas (or LP Gas to Natural Gas)
WARNING
Fire Or Explosion Hazard.
Can cause property damage, severe injury
or death.
1. Do not attempt to convert step-opening models
(suffix letter P).
2. Always change the main and pilot burner
orifices when converting from natural to LP gas
or from LP to natural gas. Carefully follow
appliance manufacturer specifications and
instructions to assure proper appliance
conversion.
3. Gas controls are factory-set for natural (and
manufactured) or LP gas. Do not attempt to
use a gas control set for natural
(manufactured) gas on LP gas, or a gas control
set for LP gas on natural (manufactured) gas.
Controls with standard, slow-opening, and two-stage
regulators (model numbers with suffix H, K, M, or Q) can
be converted from one gas to the other with a conversion
kit (ordered separately). See Table 4 for the correct
conversion kit.
Convertible Pressure Regulators
Controls with suffix letter R are convertible pressure
regulator models. They can be converted from natural
gas to LP gas or from LP gas to natural gas without a
conversion kit.
Before converting the control from one gas to another,
check the control label and the appliance manufacturer’s
rating plate to determine if the pressure regulator setting
(factory set) will meet the appliance manifold
requirements after conversion.
NOTE: Convertible pressure regulator models (suffix
letter R) do not have field-adjustable regulators.
If the factory pressure regulator setting meets the
appliance manifold requirement, convert the control as
follows:
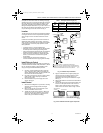
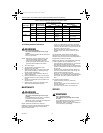
1. Remove the pressure regulator cap, Fig. 1.
2. Invert the cap so that the letters appear that
represent the gas type appropriate for the
appliance. NAT for natural manufactured gas, LP
for liquid petroleum gas.
3. Replace the cap and tighten firmly.
Fig. 1. Top view of convertible pressure regulator
cap.
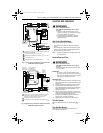
Install Adapters To Control
If adapters are being installed on the control, mount them
as follows:
Flanges
1. Choose the appropriate flange for your application.
2. Remove the seal over the ignition system control
inlet or outlet.
3. Make sure that the O-ring is fitted in the groove of
the flange. If the O-ring is not attached or is
missing, do not use the flange.
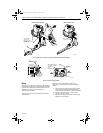
4. With the O-ring facing the gas control, align the
screw holes on the control with the holes in the
flange. Insert and tighten the screws provided with
the flange. See Fig. 2. Tighten the screws to 25
inch-pounds of torque to provide a gas-tight seal.
Fig. 2. Firmly fasten flange to valve, but do not
overtighten screws.
Bushings
1. Remove the seal over the control inlet or outlet.
2. Apply a moderate amount of good quality pipe
compound to the bushing, leaving two end threads
bare. On an LP installation, use compound that is
resistant to LP gas. Do not use Teflon tape.
3. Insert the bushing in the control and carefully
thread the pipe into the bushing until tight.
P
RESSURE
R
EGULATOR
C
AP
M1167
8
N
A
T
N
A
T
L
P
L
P
N
A
T
N
A
T
OR
OTHER SID
E
OF CAP
M904
6
VALVE OUTLET
FLANGE
9/64 INCH HEX SCREWS (4)
DO NOT OVERTIGHTEN SCREWS. TIGHTEN TO
25 INCH-POUNDS.
1
1
69-1226-2.fm Page 4 Thursday, November 13, 2003 12:50 PM