


9
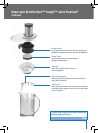
Assembling your Breville ikon™ Froojie™ Juice Fountain
®
Assembling your Breville ikon™ Froojie™ Juice Fountain
®
continued
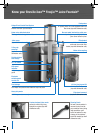
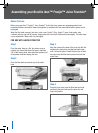
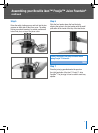
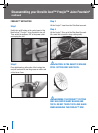
Step 5
Raise the safety locking arm up and locate it into the
two grooves on either side of the juicer cover. The
safety locking arm should now be in a vertical position
and locked into place on top of the juicer cover.
Step 6
Slide the food pusher down the feed chute by
aligning the groove of the food pusher, with the
small protrusion on the inside top of the feed chute.
Continue to slide the food pusher down into the feed
chute.
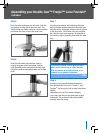
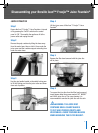
Step 7
Place the pulp container into position by tilting the
base of the pulp container away from the motor base
and slide the top of the pulp container over the bottom
of the juice cover. Tilt the base of the pulp container
back into the motor base ensuring it is supported by
the container support extending from under the motor
base.
To minimise cleaning, line the pulp container
with a plastic freezer bag to collect the pulp.
Pulp can then be used in other dishes, or as
compost for the garden or discarded.
Note
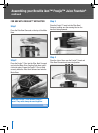
Step 8
Place the juice jug provided under the spout on
the right-hand side of the ikon™ Froojie™ Juice
Fountain
®
. The juice jug lid can be used to avoid any
splatter.
Alternatively you can fit the custom-designed
juice nozzle over the juice spout and place a glass
underneath. The juice nozzle will prevent splatter,
ensuring mess free juicing.