


10
PROGRAM MODE
General Conventions (unless otherwise indicated)
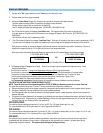
1. To enter or exit Program Mode simultaneously depress both the Rinse key and the Stop key until the buzzer sounds (approximately 1.5
seconds).
2. Pressing the Stop key will cause the menu to scroll up and pressing the Rinse key will cause the menu to scroll down.
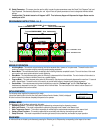
3. The blinking LED's) signify which Hopper or Serving Size the displayed parameter corresponds to.
4. Pressing the ▼or ▲ keys individually will decrease or increase the displayed parameter respectively.
5. Pressing the ▼and ▲ simultaneously will cause the parameter to revert to a default value.
Functions:
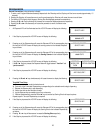
1. All Dispense LED’s will be illuminated and the LCD/VFD screen will display the following: DISPENSE TOTAL
SELECT A KEY
2. If the Stop key is pressed the LCD/VFD screen will display the following: DISPENSE TOTAL
#######.# OZ.
3. Pressing any of the Dispense keys will cause the Dispense LED of the corresponding key to
blink and the LCD/VFD screen will display the serving counter for the indicated Dispense
key as follows:
SERVING COUNTER
SELECT A KEY
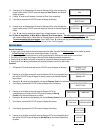
4.
Pressing any of the Dispense keys will cause the Dispense LED of the corresponding key to
blink and the LCD/VFD screen will display the Serving Counter for the indicated Dispense
key as follows:
SERVING COUNTER
##### CUPS
5.
6.
If the Stop key is pressed the LCD/VFD screen will display the following:
If the▼or ▲ keys are pressed the Dispense Mode will toggle between “free flow” and
“portion control”.
DISPENSE
MODE FREE
FLOW
DISPENSE MODE
PORTION CONTROL
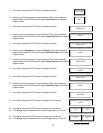
7. If the Stop key is pressed the LCD/VFD screen will display the following: TEACH-ME SETUP
ARE YOU SURE ?
8. Pressing the ▼and ▲ keys simultaneously will cause the menu to display the following:
TEACH-ME SETUP
SELECT A KEY
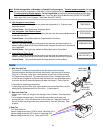
Teach Me Timer Setup
A. Place cup or decanter under the desired nozzle.
B. Press one of the illuminated Dispense keys corresponding to the selected nozzle to begin dispensing.
C. Release the Dispense key to stop dispensing.
D. Wait a short time to allow the foam to settle.
E. Jog the Dispense key as needed to top off cup or decanter.
F. If desired simultaneously press the ▼and ▲ keys to use the last Serving Size for all equal cup sizes.
Repeat steps A-F for each Dispense key as required.
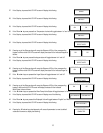
9. If the Stop key is pressed the LCD/VFD screen will display the following:
SERVING SIZE
SELECT A KEY
10. Pressing any of the Dispense keys will cause the Dispense LED of the corresponding key to
blink and the LCD/VFD screen will display the Serving Size for the indicated Dispense key
as follows:
SERVING SIZE
##.# OZ.
11. Pressing ▼or ▲ key will decrease or increase the Serving Size respectively.
12. If the Stop key is pressed the LCD/VFD screen will display the following:
GRAM THROW
SELECT A KEY