


16
Installation Instructions
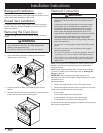
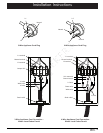
Re-installing the Oven Door
WARNING
To avoid personal injury or damage to the door from it
falling off its hinges:
• Make sure that the notch on the bottom of each hinge rests
on top of the lower lip of each hinge receptacle before
attempting to open the oven door.
• Rotate the hinge locks toward the front of the range
immediately after installation of the door.
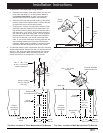
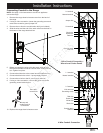
1. Grasp the oven door on opposite sides and hold it at a 15°
angle from the front of the range. Slide the hinges into the
hinge openings, resting the bottom of the hinge arms on the
hinge receptacles. Continue to hold the door at a 15° angle
with one hand while pushing in on each of the bottom corners
of the door. Push until the notch on the bottom of each hinge
slips over the lower lip of each hinge receptacle.
2. Lower the door to the fully opened position.
3. Rotate the two hinge locks toward the range.
4. Slowly and carefully open and close the door completely to
ensure that it is properly installed.
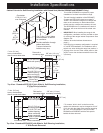
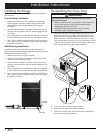
Installing the Range
Peel off the protective layer of plastic that covers the stainless
steel surfaces.
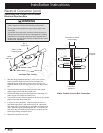
Freestanding Installation
1. Measure from the floor to the countertop and adjust the
leveling legs as required to position the top frame at the
desired height, based on the cabinet and countertop
installation.
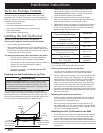
2. Carefully slide the range into position in the cutout. As you
slide the unit into place the rear leg should engage the anti-
tip bracket.
3. Using a flashlight look underneath the range and verify that
the anti-tip bracket covers the rear leg. See diagram below.
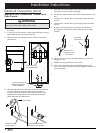
4. Use a level to make sure that the range does not tilt front to
back or side to side. Re-adjust the legs to level and change
the height if necessary.
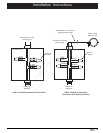
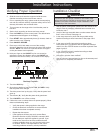
Self-Rimming Installation
Installation of the range in the self-rimming configuration is
slightly different from freestanding installation since the range top
overhangs the countertop cutout.
1. Measure from the floor to the countertop.
2. Adjust the leveling legs to position the bottom edge of the
range top trim at countertop height.
3. Carefully slide the range into position in the cutout. As you
slide the unit into place the rear leg should engage the anti-
tip bracket.
4. Using a flashlight look underneath the range and verify that
the anti-tip bracket covers the rear leg. See diagram below.
5. Use a level to make sure that the range does not tilt front to
back or side to side. Re-adjust the legs to level and change
the height if necessary.
Anti-tip
bracket
Rear leg