


17
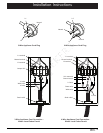
Installation Instructions
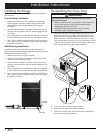
Verifying Proper Operation
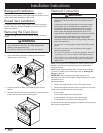
1. Remove any packaging from inside the oven.
2. Slide the oven racks onto the supports inside the oven
chamber according to the use and care manual.
3. Prior to operating the range, please read the accompanying
use and care manual carefully. Important safety, service and
warranty information are contained within.
4. Turn on power to the range at the circuit breaker panel or
fuse box.
5. Set the clock according to the use and care manual.
6. Press the BAKE key on the control panel. The default bake
temperature should appear on the display.
7. Press START. After approximately three (3) minutes, check to
make sure the oven is heating.
8. Press CANCEL SECURE.
9. Place a pot 1/4 full with water on one of the cooking
elements. Match the size of the pot to the size of the cooking
element. NOTE: You must use a pot that attracts a magnet
on the pan bottom to test operation.
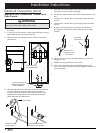
10. Hold your finger on the ON/OFF key for one second to
activate the control (the diagram next to the ON/OFF key
determines the correct control). “0” will flash on the display.
11. Touch the HIGH key.
12. Once the pot begins to heat, touch LOW, then MED. Verify
that the power level changes.
13. Touchthepowerlevelupkey(▲).Verifythatthepowerlevel
goes up.
14. Touchdown(▼).Verifythatthepowerlevelgoesdown.
15. Touch ON/OFF to turn off the cooktop.
16. If either the oven or cooktop does not operate properly, follow
these troubleshooting steps:
◊ Verify that power is being supplied to the range.
◊ Check the electrical connections to ensure that the
installation has been completed correctly.
◊ Repeat the above tests.
◊ If the appliance still does not work, contact Dacor
Distinctive Service at (800) 793-0093, extension 2822.
Do not attempt to repair the appliance yourself. If you
need service, be sure to have the model and serial
numbers available when you call. See the inside cover
for location. Dacor is not responsible for the cost of
correcting problems caused by a faulty installation.
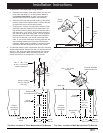
Installation Checklist
WARNING
To ensure a safe and proper installation, the installer must
perform the following checklist to ensure that no part of the
installation has been overlooked. Proper installation is the
responsibility of the homeowner.
1. Has the plastic coating been peeled off of the outside of the
range? Have all packaging materials been removed from
inside the oven?
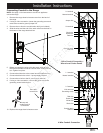
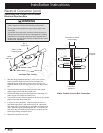
2. Are all of the legs extended down to make contact with the
floor? Is the unit level? See page 16.
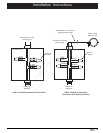
3. Is the range secured in place with the provided anti-tip
bracket according to these instructions? See page 8 and
16.
4. Is the range wired and grounded according to these
instructions and in accordance with all applicable electrical
codes? Has the electrical access cover been replaced? See
pages 3 and 10.
5. Is the oven door properly installed according to these
instructions? See page 16.
6. Has proper operation been verified?
7. Has the warranty been activated on-line or the warranty card
been filled out completely and mailed?
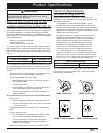
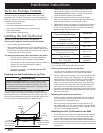
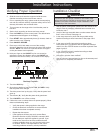
Cooktop Controls
ON/OFF
ON indicator
LOW MED HIGH
Power level