1 Installing the Tape Drive
This section provides instructions for the following tasks:
■
Unpacking the tape drive and ensuring ESD
protection (page 10)
■
Setting the SCSI ID (page 11)
■
Preparing the tape drive for the SCSI bus (page 14)
■
Installing the tape drive in a PC drive bay (page 17)
■
Connecting the tape drive to the power supply (page
20)
■
Performing the initial power on (page 20)
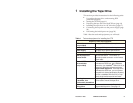
Table 1 lists the tools and equipment you will need.
Required Tools and Equipment
SCSI cable
(not provided)
See page 37 for SCSI cable requirements.
Power cable See page 40 for power cable requirements.
Power supply See page 42 for power specifications.
Optional Tools and Equipment
SCSI ID jumpers or
remote switch
Use a female Molex
®
22-55-2061 (or
equivalent) cable connector on the remote
switch cable.
External SCSI
bus terminator
(not provided)
Differential tape drive: If the tape drive
terminates the SCSI bus, use a Methode
Electronics, Inc. dataMate
®
DM103-01-0 (or
equivalent) differential external terminator.
Single-ended tape drive: If the tape drive
terminates the SCSI bus, you can remove
the tape drive’s internal terminators (R-packs)
and use a dataMate DM103-02-0 (or equi-
valent) single-ended external terminator.
Mounting frame
or brackets, four
#6-32 screws, screwdriver
Depending on your installation requirements,
can be used to mount the tape drive.
Flat-nose
wiring pliers
Can be used to remove the R-packs from a
single-ended tape drive. See page 15.
Table 1 Tools and equipment for installing the CTS
December 1993 EXB-8500/EXB-8500c 9


