


30 31
Note: If you are unsure of the
PH value of the foods you
want to cook, we strongly
recommend using the pressure
canning method. Instructions for
boiling water bath method:
Fill the pot about halfway with hot
water. Turn on the burner and heat
the water. Have the water in the
canner hot but not boiling to prevent
breakage of the jars when they’re
placed in the canner. Follow the
same steps detailed in the pressure
cooker method for filling jars.
When the water in the pot reaches
a rolling boil, begin counting the
correct processing time. Boil gently
and steadily for the recommended
time, adjusting the heat and adding
more boiling water as necessary.
Use a jar lifter to carefully remove
the jars as soon as the processing
time is up. Place the hot jars right
side up on a rack, dry towels,
boards or newspapers to prevent
the jars from breaking on contact
with a cold surface. Leave at least
1 inch of space between jars.
Do not tighten the lids. Allow
the jars to cool untouched for
12 to 14 hours. Selecting the
Correct Processing time to
destroy microorganisms in low
acid foods processed with a
pressure cooker, you must:
• Process the jars for the correct
number of minutes at suggested
setting (low or high pressure)
• Allow cooker to cool at room
temperature until it is completely
depressurized. To destroy
microorganisms in high-acid
foods processed in a boiling-
water bath, you must:
• Process jars for the correct
number of minutes in boiling water.
• Cool the jars at room temperature.
The food may spoil if you fail
to use the proper processing
times, fail to vent steam from
pressure cooker properly,
process at lower pressure than
specified, process for fewer
minutes than specified, or cool
the pressure cooker with water.
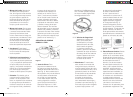
4. Finishing Touches:
Testing the Lid for a Proper
Seal: Most two-piece lids will
seal with a “pop” sound while
they’re cooling. When it is
completely cool, test the lid. It
should be curved downward
and should not move when
pressed with a finger. If a jar is
not sealed, refrigerate it and use
the unspoiled food within two to
three days or freeze it. If liquid
has been lost from sealed jars
do not open them to replace it,
simply plan to use these first. The
food may discolor, but if sealed,
the food is safe to consume.
Unsealed Jars: What to Do If a lid
fails to seal, you must reprocess
within 24 hours. Remove the lid,
and check the jar-sealing surface
for tiny nicks. If necessary, change
the jar. Always use a new, properly
prepared lid, and reprocess using
the same processing time. The
quality of reprocessed food is
poor. Instead of reprocessing,
unsealed jars of food also can be
frozen. Transfer food to a freezer-
safe container and freeze. Single,
unsealed jars can be refrigerated
and used within several days.
Always Inspect Canned Food Before
Consuming: Just as you would
avoid a foul smelling, leaking
or opened jar of food at the
supermarket, don’t taste or use
home canned food that shows any
sign of spoilage. Examine all jars
before opening them. A bulging lid
or leaking jar is almost always a sure
sign of spoilage. When you open
the jar, look for other signs such
as spurting liquid, unusual odor or
mold. Sterilization of empty jars Use
sterile jars for all boiling water bath
recipes. To sterilize empty jars, put
them right side up on the rack in a
boiling-water bath. Fill the bath and
jars with hot (not boiling) water to 1
inch above the tops of the jars. Boil
10 minutes. Remove and drain hot
sterilized jars one at a time. Save
the hot water for processing filled
jars. Fill jars with food, add lids, and
tighten screw bands. Empty jars
used for vegetables, meats, and
fruits to be processed in a pressure
cooker need not be sterilized
beforehand. It is also unnecessary
to sterilize jars for fruits, tomatoes,
and pickled or fermented foods that
will be processed 10 minutes or
longer in a boiling-water canner.
Label and Store Jars: The screw
bands should be removed from
the sealed jars to prevent them
from rusting on. The screw bands
should then be washed, dried
and stored for later use. Store in
a clean, cool, dark, dry place. The
best temperature is between 50
and 70 °F. Avoid storing canned
foods in a warm place near hot
pipes, a range or a furnace, or in
direct sunlight. They lose quality in
a few weeks or months, depending
on the temperature and may even
spoil. Keep canned goods dry.
Dampness may corrode metal
lids and cause leakage so food
will spoil. For best quality, use
canned foods within one year.
Important Home
Canning Safeguards
All of the Home Canning Recipes
provided in this cookbook have been
tested for quality and proper timing
to meet food safety standards.
As long as the instructions are
carefully followed the end result will
be a wholesome and shelf stable
product. However, when using or
adapting your own recipes, please
be sure that you process the recipes
with enough time. If foods are not
canned properly, consuming them
may be harmful or fatal. Never
attempt to make rough calculations
on your own recipes. If you have
specific questions relating to proper
methods of canning foods or timing
charts- please refer to the US
Department of Agriculture Website.
www.fsis.usda.gov . Another useful
source of information about home
canning is The National Center for
Home Food Preservation: www.
uga.edu/nchfp/index.html.
CHEF INTERIOR 12-19.indd 30-31 12/19/11 9:14 AM