


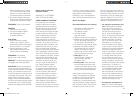

8 9
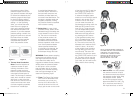
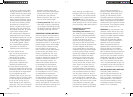
the pressure cooker. When
pressure begins to build, the
grey pressure indicator will begin
to rise and simultaneously the
pressure gauge will also begin
to rise from resting position.
If you have selected pressure
setting 1 on the Operating
Valve, you will see the entire
black line on the gauge as
soon as the pressure cooker
has reached complete LOW
pressure. If you have selected
pressure setting number2, the
gauge will continue to rise until
both black lines are visible,
indicating you have reached
complete HIGH pressure
within the pressure cooker.
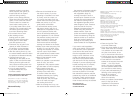
Figure 3 Figure 4
12. Thermo Heat Conductive
Base: Since the objective of
a pressure cooker is rapid
cooking, the bottom of the
pressure cooker pot has a
thermo heat conductive base,
comprised of three layers of
metal. The first layer is stainless
steel, which is safe for contact
with food. In view of the fact
that aluminum should not be in
contact with food and it does
not have magnetic properties,
the aluminum middle layer
is sandwiched between the
two outer layers. Aluminum is
the best heat conductor and
therefore provides faster and
more even heat distribution. The
last layer is stainless steel with
magnetic properties, making
the pressure cooker compatible
with induction cooking.
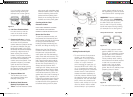
13. Safety Vent: In case of high
pressure buildup, steam will be
released through the safety vent
cutout located in the rim of the
lid. The cutout in the handle
of the pressure cooker is an
emergency pressure release
mechanism that should never
become operative under normal
use. If both pressure release
valves become blocked due
to over filling, for example, the
pressure will tear the gasket
and escape through this hole.
WARNING: Excess steam escaping
through the hole will be very hot
and might cause serious injuries.
In the event the safety vent is
triggered to release excess pressure,
always place the pressure cooker
on the stove in such a position
that the Safety Vent is not facing
towards you or towards anything
that could get damaged by the
steam and sputtering liquid.
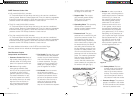
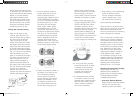
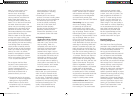
14. Timer: The Fagor Chef comes
with a built-in removable timer
that allows you to time your
meal up for to 99 minutes. To
remove the timer from the unit,
simply pull the tab on the corner
of the timer and lift. To start the
timer, begin by holding down
the START/STOP button for
3 seconds the digital screen
should turn on and 00.00 should
appear in the window (Fig. 5).
If there is time on the clock,
you can reset the screen by
simultaneously holding down the
MIN and SEC buttons on the
timer (Fig. 6). To set the timer,
you can independently select
the minutes by pressing the
MIN button and the seconds
by pressing the SEC button
to the specified cooking time
(Fig 7). To begin timing, press
the START/STOP button (Fig
8). The clock on the timer will
decrease until it reaches 00.00
when it is done. At the end
of the cooking time, the alarm
will ring letting you know your
meal is ready. The alarm will
continue to ring until you press
the START/STOP button to shut
off. The alarm will not stop the
pressure cooker from cooking
your meal; you will need to shut
off the heat to finish cooking.
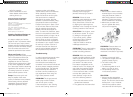
Figure 5
Figure 6
Figure 7
Figure 8
NOTE: THE APPROXiMATE LiFEsPAN OF
THE TiMER BATTERY is APPROXiMATELY
18 MONTHs. YOU CAN REPLACE
THE BATTERY YOURsELF WHEN iT
RUNs OUT BY REPLACiNG iT WiTH
ANY NEW sMALL ELECTRONiC
BATTERY, MODEL # sR1130W.
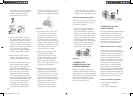
15. Max Fill Line: This line indicates
the maximum amount of liquid
and food that should not exceed
the pressure cooker. When filling
the pressure cooker please
do not fill the pressure cooker
beyond the MAX FILL LINE (Fig
9) or more than two thirds full
with liquid and food, or half full
CHEF INTERIOR 12-19.indd 8-9 12/19/11 9:14 AM