


7-10
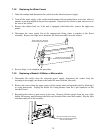
4. Remove the four bolts securing the motor mount to the frame, then remove the motor and mount
assembly from the unit. NOTE: It is possible to replace a motor or the microswitch without
removing the motor and mount assembly, but it is much more difficult.
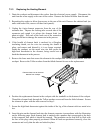
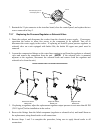
5. Dismount the motor or microswitch as shown below and install the replacement.
Loosen setscrew in bottom
of cam (bell crank).
NOTE:
The right motor and microswitch
dismount in the same way as the left.
6. Reverse Steps 1-4 to complete the procedure.
7.3.10 Replacing the Cookpot
1. Drain the cookpot and disconnect the unit from the electrical power supply.
2. If so equipped, remove the faucet assembly from the cooker in accordance with Steps 1-4 of
Section 7.3.8.
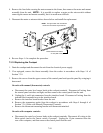
3. Remove the screws from the upper corners of the control panel and open the panel by swinging it
downward.
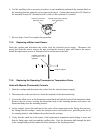
On units with manual (thermostat) controls:
a. Disconnect the water level sensor leads at the cookpot terminals. Disconnect all wiring from
the control panel switches and light, and then remove the control panel from the unit.
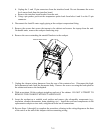
b. Unplug the 4- and 6-pin connectors from the interface board. Disconnect all wiring from the
terminal block mounted next to the interface board.
c. Remove the interface board bracket from the unit.
d. Remove the temperature probe from the cookpot in accordance with Steps 4 through 6 of
Section 7.3.6 (Units with Manual (Thermostat) Controls).
e. Remove the thermostat mounting bracket with thermostat attached.
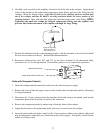
On units with computer controls:
a. Disconnect the water level sensor leads at the cookpot terminals. Disconnect all wiring to the
Skim switch (and to the Faucet switch, if present). Unplug the 15-pin connector from the
rear of the computer, and then remove the control panel from the unit.