


3-10
3.6.3 Replacing the Interface Board
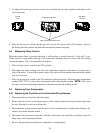
1. Remove the component box per steps 1 through 9 of Section 3.6.2.
2. Unplug the controller wiring harness from the interface board.
3. Disconnect the wires attached to the interface board, marking or making a note of the wires and
terminals to facilitate reconnection.
4. Remove the nuts at each corner of the interface board and pull it from the studs.
5. Reverse the procedure to install the replacement board, being sure to reinstall the spacers behind
the interface board.
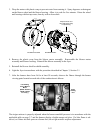
3.6.4 Replacing an Ignition Module
1. Disconnect the fryer from the electrical supply.
2. Remove the screws from the upper corners of the control panel and swing the panel open from
the top, allowing it to rest on its hinge tabs.
3. Disconnect the wires from the ignition module, marking or making a note of the wires and termi-
nals to facilitate reconnection.
4. Remove the four ignition module screws and pull the module from the component box.
5. Reverse the procedure to install the replacement module.
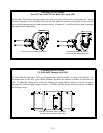
3.6.5 Replacing an Ignitor Assembly
DANGER
Drain the frypot or remove the handle from the drain valve before proceeding further.
1. Disconnect the fryer from the electrical supply.
2. Disconnect the ignition cable from the ignitor by grasping the boot and gently pulling toward
you.
3. Remove the two sheet metal screws securing the ignitor to the mounting plate and pull the ignitor
from the fryer.
4. Reverse the procedure to install the replacement ignitor.