


3-15
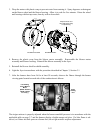
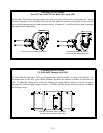
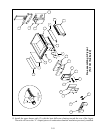
8. Remove the washers and tubular spacers from the mounting studs, then pull the inner covers
straight out toward you until clear of the mounting studs.
9. Grasp the burner firmly and pull it toward you until it clears the burner channels, taking care not
to damage the ceramic tiles in the process.
10. Clean all debris from the burner channels and combustion area.
11. Inspect the upper and lower burner rails for cracked or burned-out welds.
a. If the welds in the lower rail are cracked or burned out, the frypot must be replaced. Refer to
Section 3.6.9 for procedure.
b. If the welds in the upper rail are cracked or burned out, the upper rail must be replaced. Re-
fer to Section 3.6.10 for procedure.
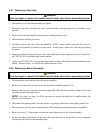
12. Place a new insulating strip along the top, rear, and bottom edge of the burner and carefully slide
it straight into the rails.
NOTE: Use P/N 826-0931 for full vat frypots and P/N 826-0932 for dual vat frypots.
13. Reverse steps 1 through 9 to reassemble the components.
14. Fill the frypot with oil. Turn the fryer on, turn off or bypass the melt cycle, and operate the unit
for at least 10 minutes.
15. Visually examine the burner flame. The color and intensity on both sides should be the same.
16. Use an inspection mirror to check for leaks in areas that cannot be directly observed.
17. If a leak is detected, tighten all the lower insulation retainer nuts, allow the frypot to run for five
additional minutes, and repeat steps 15 and 16.
18. If the leak persists, use a rubber hammer and a small block of wood to tap the corners of the
lower combustion chamber insulation retainers. Repeat steps 15 through 17. Repeat this step
until no leakage is detected.
3.6.9 Replacing the Frypot
1. Drain cooking oil/shortening from the frypot.
2. Remove all accessories, e.g., frypot covers, basket lift arms, etc. from the fryer.
4. Disconnect the fryer from gas and electrical supplies.
5. Remove the screws from the topcap above the control panel and lift it up and off the fryer(s).