


3-14
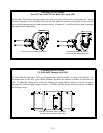
3.6.7 Replacing a Gas Valve
DANGER
Drain the frypot or remove the handle from the drain valve before proceeding further.
1. Disconnect fryer from electrical and gas supplies.
2. Disconnect the wires from the gas valve terminal block, marking each wire to facilitate recon-
nection.
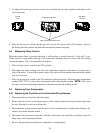
3. Remove the vent tube and the enrichment tube fitting from the valve.
4. Disconnect the flexible gas line(s).
5. Carefully unscrew the valve from the manifold. NOTE: Some models may have the valve at-
tached to the manifold by means of a pipe union. In such cases, remove the valve by uncoupling
the union.
6. Remove all fittings from the old gas valve and install them on the replacement valve, using Loc-
tite
®
PST56765 or equivalent pipe thread sealant.
7. Apply Loctite
®
PST 56765 or equivalent pipe thread sealant to the threads of the manifold (or the
union). Reverse steps 1-5 to install the replacement gas valve.
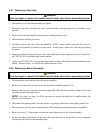
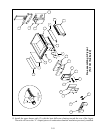
3.6.8 Replacing a Burner Assembly
DANGER
Drain the frypot or remove the handle from the drain valve before proceeding further.
1. Disconnect the unit from the electrical and gas supplies.
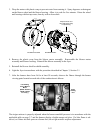
2. Remove the combustion air blower per the procedure found in Section 3.6.6.
3. Remove the four nuts from the air plenum assembly and pull the assembly straight out toward
you until it clears the burner tubes.
NOTE: On a dual vat fryer, it will be necessary to remove the drain valve handles before the
plenum can be removed.
4. Disconnect the ignition cables from the ignitors by grasping their boots and pulling toward you.
5. Disconnect the gas lines and enrichment tubes from the burner orifices and ignitor assemblies.
6. Remove the four ¼” (6mm) nuts securing the outer front covers to the frypot assembly.
7. Remove the sheet metal screws at the top of the outer front covers and pull the covers straight out
toward you until clear of the mounting studs.