


3-17
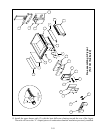
3.6.10 Replacing Frypot Insulation and/or Upper Burner Rails
NOTE: Replacing the burner rails requires completely tearing down the frypot and installing new
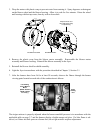
frypot insulation. Refer to the frypot exploded view on page 3-18 for component identification.
1. Remove the frypot per Section 3.6.9.
2. Remove the burner assemblies (1).
3. Remove insulation retainers and blanket insulation (2).
4. Remove the upper oil zone insulation bracket and upper oil zone insulation (3).
5. Remove the plenum (4).
6. Remove the front lower combustion chamber insulation retainer and insulation (5), and the front
lower combustion chamber inner insulation retainer and insulation (6).
NOTE: Full vat units have two-piece insulation retainer and insulation components. Dual vat
units have one-piece components.
7. Remove the upper combustion chamber insulation retainer and insulation (7).
8. Remove the inner upper combustion chamber insulation retainer and insulation (8).
9. Remove the rear lower combustion chamber retainers, back, and insulation (9).
NOTE: Full vat units have two-piece backs and four retainers. Dual vat units have one-piece
backs and two retainers.
10. Remove the flue assembly (10).
11. Remove the upper burner rails (11).
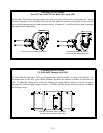
NOTE: For the following steps, refer to the frypot exploded view on page 3-19 for component
identification.
12. Remove any residual insulation, sealant, and/or oil from the exterior of the frypot.
13. Place the “L” shaped pieces of combustion chamber insulation (1) in the front and rear corners of
both upper rail-retaining slots.
14. Use a small amount of furnace or muffler repair cement to seal the gaps at each end of both lower
rails. (See inset, page 3-19.)