Page 8
Part # MCOSM06 Rev 1 (11/03/08)
INSTALLATION
Installation Notes:
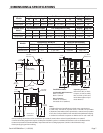
Combustible and Non-Combustible Wall Clearance: Side:
1.0" (25 mm) Rear: 3.0" (76 mm)
NOTE: Adequate clearance must be provided for servicing
and proper operation.
The importance of the proper installation of Commercial
Gas Cooking Equipment cannot be over stressed. Proper
performance of the equipment is dependent, in great part,
on the compliance of the installation with the manufacturer's
specications. Installation must conform to local codes or,
in the absence of local codes, with the National Fuel Code,
ANSI Z223.1, Natural Gas Installation Code, CAN/CGA-B149.1,
or the Propane Installation Code, CAN/CGA-B149.2, as
applicable.
Before assembly and connection, check gas supply.
A. The type of gas for which the unit is equipped is stamped
on the data plate located behind lower front panel.
Connect a unit stamped "NAT" only to natural gas;
connect a unit stamped "PRO" only to propane.
B. If it is a new installation, have gas authorities check meter
size and piping to assure that the unit is supplied with
sucient amount of gas pressure required to operate the
unit.
C. If it is additional or replacement equipment, have gas
authorities check pressure to make certain that existing
meter and piping will supply fuel at the unit with not
more that 1/2" water column pressure drop.
NOTE: When checking pressure be sure that all other
equipment on the same gas line is on. A pressure regulator
is supplied with GARLAND Convection Ovens. Regulator is
preset to deliver gas at pressure shown on the rating plate.
The appliance and its individual shut-o valve must be
disconnected from the gas supply piping system during
any pressure testing of that system at test pressures in
excess of 1/2 PSI (3.45 kPa).
The appliance must be isolated from the gas supply
piping system by closing its individual manual shut-o
valve during any pressure testing of the gas supply piping
system at test pressures equal to or less than 1/2 PSI
(3.45 kPa).
Installation Of Ovens Equipped With Casters
A. For an appliance equipped with casters, the installation
shall be made with a connector that complies with the
Standard for Connectors for Movable Appliances, ANSI
Z21.69 or Connectors for Moveable Gas Appliances,
CAN/CGA-6.16, and a quick-disconnect device that
complies with the Standard for Quick-Disconnect Devices
for Use With Gas Fuel, ANSI Z21.41, or Quick-Disconnect
Devices for Use with Gas Fuel, CAN1-6.9, and adequate
means must be provided to limit the movement of the
appliance without depending on the connector and the
quick-disconnect device or its associated piping to limit
the appliance movement and the location(s) where the
restraining means may be attached to the appliance shall
be specied.
B. The front casters of the unit are equipped with brakes
to limit the movement of the oven without depending
on the connector and any quick-disconnect device or its
associated piping to limit the appliance movement.
C. The restraint can be attached to the unit near the gas inlet.
If the restraint is disconnected, be sure to reconnect the
restraint after the oven has been returned to its originally
installed position.
Installation Of Double Deck Models
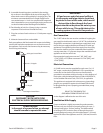
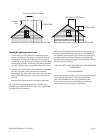
A. Position insert in bottom leg opening and tap insert up
into leg till it seats at collar. Attach six inch (6") legs to
lower oven section. Raise unit or lay on its left side. Place
the front legs on the oven so as to line up with four (4)
attaching bolt holes. Secure leg to oven frame using (4)
3/8-16 x 3/4 bolts and washers provided. Repeat at rear of
unit.
B. Remove lower front cover of top deck (located under oven
doors). Raise top deck into place and line up body sides
and back of the unit. Fasten the rear of the units together,
with the stacking bracket, as shown, using (6) 1/4-20
machine screws, lock washers and nuts, (provided).
C. Install the interconnecting ue parts, carefully following
the instructions contained in the stacking kit. Pay
particular attention to the type of ovens you are stacking
and be sure to follow the corresponding instructions.


