


Part # P157 Rev 2 (01/06/10)Page 10
7. Watch for the signs of shortening break down. An
unusual darkening of the shortening or smoking are the
rst signs of break down. Foaming, objectionable change
in avour of the product and fuming also indicate a break
down of the frying compound.
OPERATION continued
8. Set the thermostat to 200°F (93°C) during idle periods. This
will conserve energy and extend frying compound life.
MAINTENANCE AND CLEANING
NOTE: This Appliance is not Protected against Water Jets. Do
not Clean with Water Jets.
Frying Compound
It is important to keep the cooking oil clean. The frequency
of change depends on the amount of use and the type of
products cooked.
Stainless Steel
Stainless steel should be cleaned using a mild detergent,
a soft cloth and hot water. If it is necessary to use a non-
metallic scouring pad, always rub in the direction of the grain
in the metal to prevent scratching. Wash a small area at a
time and rinse the washed area with a clean sponge dipped
into a disinfectant and wipe dry with a soft clean cloth before
it can dry.
Use only stainless steel, wood or plastic tools to scrape
o heavy deposits of grease or oil. Do not use ordinary
steel scrapers or knives, as particles of iron may become
embedded and rust.
NEVER USE STEEL WOOL.
Enamelled / Painted Surfaces
Establish a regular cleaning schedule. Any spills should be
wiped o immediately. The unit should be allowed to cool
down before cleaning any exterior surfaces. Wipe exposed
surfaces when cool with mild detergent and hot water.
Stubborn residue spots may be removed with scouring pad.
Dry thoroughly with a clean cloth.
Thermostat Calibration
WARNING: Turn o the electrical mains before commencing
any service work.
It is normal for an electromechanical thermostat to cycle
with a 45° F - 50°F (25°C - 28°C). When checking calibration,
allow the thermostat to cycle a minimum of two times.
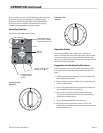
1. Place the thermocouple of the test instrument in the
center of the tank 1” (25mm) below the oil surface.
2. Turn the thermostat dial to 325° F (163° C). In order to
allow the oil temperature to stabilize, the control must be
allowed to cycle twice before taking a test reading.
3. Check the temperature reading just when the control
cycles “OFF” as indicated by the cycle pilot lamp. If the
temperature does not read within 15°F (8°C) of the dial
setting, recalibrate as follows:
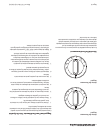
4. Carefully remove the thermostat dial, not disturbing the
dial setting.
5. Hold the thermostat shaft steady and with a small at
blade screw driver, turn the calibration screw located
inside the shaft clockwise to decrease the temperature
and counter clock wise to increase the temperature.
NOTE: Each 1/4 turn of the screwdriver will create a
change of approximately 35° F (20° C).
6. Replace the thermostat dial and repeat steps 1 through 3
to verify that correct adjustment has been made.