Part # 4517957 Rev.13 (02/10/11) Page 11
1. Turn the power switch to the “ON” position.
2. Set the thermostat to the desired temperature.
3. If ignition fails and /or the ignition system goes into
lockout, set the power switch to the “O” position.
4. Wait ve minutes and repeat steps 1 and 2. If the problem
persists have the unit checked by a competent service
technician.
Seasoning The Griddle
1. Use a clean cloth, rub a thin and even layer of oil into the
griddle surface. Oil should be an unsalted shortening or
high temperature cooking oil.
2. Set the griddle thermostat to 131°F (55°C) and heat
the griddle surface until the oil begins to caramelize
(turn a golden brow colour). Once this occurs, turn the
thermostat to “O”.
3. Scrape o the caramelized oil with a standard spatula.
4. Repeat step 1 and set the griddle thermostat to 275°F
(135°C).
5. Repeat steps 2 & 3. The griddle is now seasoned and
ready for use.
Shut Down
1. Set the thermostat to the lowest setting and turn the
power switch to the “O” position.
Solid Hot Tops (STW286A)
Recommended where long term stock pot cooking is
required for soups, sauces or stocks. Pots can be placed
anywhere on the hot top. The maximum recommended
stockpot size is 12” (305mm) in diameter.
The recommended pre-heat time is 30 minutes. This will
thoroughly saturate the plate. Pots must have at bottoms
for maximum contact with the hot surface. Roasting pans
with straps should never be used on a top since only the
straps touch the surface and heat transfer will be minimal.
Lighting The Solid Hot Top
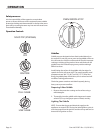
1. Push in the tap and turn it anti-clockwise to the ignition
position “ ”.
2. Holding the tap fully in, depress the ignitor switch button
and observe that the pilot lights. If it does not, depress
the ignitor switch button until it does.
OPERATION continued
3. When the pilot is lit, continue to hold the tap for 20
seconds, then release it. If the pilot extinguishes or fails to
hold, wait ve (5) minutes and then repeat step 1.
4. When the pilot is established, push the tap in again and
turn it anti-clockwise to the full ame position “ ” thus
lighting the main burner.
5. For low ame or simmer, push the tap in again and turn it
anti-clockwise to the low ame “ ” position.
6. To shut the burner o, turn the dial to the “ ” position
and the safety device will disengage within 60 seconds.
Oven
The temperature is automatically controlled by the
thermostat so that satisfactory cooking can be repeated. For
the best performance the following instructions should be
followed.
GRID SHELVES – There are three shelf positions. The shelf
position is governed by the size of the product to be cooked.
Always push the shelf back into the oven until it stops by
making contact with the rear of the oven.
TRAY SIZE – A cake tray may be used on each shelf. Single
trays or dishes must not be allowed to overhang the shelf
in any direction, since this will adversely aect the heat
circulation.
PREHEAT TIME – Allow at least 45 minutes after turning
the oven on from cold, with the thermostat at the desired
temperature before loading the oven with food to be
cooked. Put the food in quickly and close the oven door.
Convection Oven
The forced air range oven consists of a food preparation
chamber completely sealed from the combustion area. This
permits an ecient method of circulating the heated air
within the cooking chamber.
Lighting the Oven
NOTE: Ensure that the gas and electrical supply to the
appliance are turned “ON”. During the initial ignition cycle, air
must be purged from the gas line and thus it may take two to
three tries for ignition to occur.
1 Turn the power switch to the “ON” position and the Cook/
cool switch to the “COOK” position.
2 Set the thermostat to the desired position.


