


● Foods with unbroken outer
“skin” such as potatoes,
sausages, tomatoes, apples,
chicken livers and other giblets,
and egg yolks (see previous
caution) should be pierced to
allow steam to escape during
cooking.
● Not all plastic wrap is
suitable for use in microwave
ovens. Check the package
for
proper use.
● Spontaneous boiling—Under
certain special circumstances,
liquids
may
start to boil during
or shortly
after removal from
the microwave oven. To prevent
burns from splashing liquid, stir
the liquid briefly before
removing the container from the
microwave oven.
●
~~Boilable’?
cooking pouches
and tightly closed plastic bags
should be slit, pierced or vented
as directed by package. If they
are not, plastic could burst
during or immediately after
cooking, possibly resulting in
injury.
‘Also,
plastic
storag-e
containers should be at least
partially uncovered because
they form a tight seal. When
cooking with containers
tight
covered with plastic wrap,
Y
remove
cover;ng
carefully and
direct steam away from hands
and face.
● Hot foods and steam can
cause burns. Be careful when
opening any containers of hot
food, including popcorn bags,
cooking pouches and boxes. To
prevent possible injury, direct
steam away from hands and face.
● Use of the DOUBLE
DUTYTM
Shelf accessory.
—Remove the shelf from oven
when not in use.
—Do not store or cook with
shelf
on
floor
of oven. Product damage
may result.
—Use pot holders when handling
the shelf
and
cookware. They may
be hot.
—Do
not use microwave browning
dish on shelf. The shelf could
overheat.
—Be sure that the shelf is
positioned properly inside the
oven to prevent product damage.
Use of shelf with Auto Cook,
Auto Reheat or Popcorn feature
is not recommended (see the Auto
Cook, Auto Reheat, or Popcorn
sections).
SAVE THESE
INSTRUCTIONS
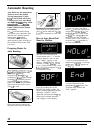
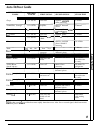
Program Cooking
Use your Touch Control Panel to
Auto Cook, Auto Roast, Auto
Reheat and Auto Defrost—with
the oven setting the power levels
and
cooking or heating times; to
Temp
Cook & Hold, using your
choice
of temperature; to Time
Cook or Time Defrost, using your
choice
of
power levels from 1
(lowest)
to
10
(highest); to heat
foods
for
30
seconds using Add
30
Seconds; to set the clock;
and
to
time kitchen tasks with the
Min/Sec Timer.
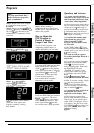
Create your own programs to suit
your individual cooking style. For
example: program
a
hold time
between Time Defrost
and
Time
Cook I & 11; set Time Cook I & 11
for
a
two-stage program using
different times and power levels;
or use the
Min/Sec
Timer to delay
the start
of
a cooking function,
such as
Temp
Cook & Hold.
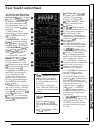
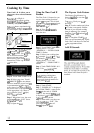
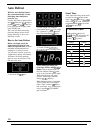
When You Plug in
the Oven
The display panel lights up. After
15 seconds, all lights disappear
and
“RESET” appears. Touch the
CLEAR/OFF pad
and
oven is ready
for
use
and
the clock can be set.
If
power is disrupted at any time,
the above sequence recurs and you
must reset clock after touching
CLEAR/OFF.
Optional Accessory
Optional accessories are available
at
extra cost from your GE supplier.
JX18K Installation Kit converts
this oven to
a
built-in wall oven.
Note:
JX
18K
kits should not be
installed above a built-in oven with
rotisserie feature.
5