


45
2. Removal and Replacement of Extruding Head
1) Move the control switch to the "DRAIN" position and drain all of the water from the
evaporator.
2) After the water has stopped draining, move the control switch to the "OFF" position, then
turn off the power supply. Remove the front and top panels, then move the power switch
to the "OFF" position.
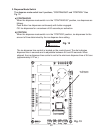
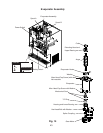
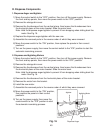
3) Remove the storage bin cover. Remove spout B, then remove spout A and the cutter.
See Fig. 14.
4) Remove the apron panel, then remove the left side panel.
5) Remove the allen head cap screws (with seals) securing the extruding head and
discard. NOTICE! The allen head cap screws (with seals) are not reusable. New
allen head cap screws (with seals) must be used.
6) Lift off the extruding head.
7) Place the new extruding head in place and tighten down with new allen head cap
screws.
8) Replace the cutter in its correct position.
9) Replace spout A, spout B, and the storage bin cover in their correct positions.
10) Move the power switch to the "ON" position, then replace the panels in their correct
positions.
11) Turn on the power supply, then move the control switch to the "ICE" position to start the
automatic icemaking process.
3. Removal and Replacement of Auger
1) Move the control switch to the "DRAIN" position and drain all of the water from the
evaporator.
2) After the water has stopped draining, move the control switch to the "OFF" position, then
turn off the power supply. Remove the front and top panels, then move the power switch
to the "OFF" position.
3) Remove the storage bin cover. Remove spout B, then remove spout A. See Fig. 14.
4) Remove the apron panel, then remove the left side panel.
5) Remove the allen head cap screws (with seals) securing the extruding head and
discard. Using the cutter, lift out the auger assembly.
6) Remove the cutter, extruding head, and upper part of the mechanical seal from the
auger and place them on the new auger. NOTICE! To help prevent water leaks, be
careful not to damage the surfaces of the O-ring or mechanical seal.
7) Install the new auger assembly with the upper part of the mechanical seal attached.
Secure the auger assembly using new allen head cap screws.
8) Replace spout A, spout B, and the storage bin cover in their correct positions.
9) Move the power switch to the "ON" position, then replace the panels in their correct
positions.
10) Turn on the power supply, then move the control switch to the "ICE" position to start the
automatic icemaking process.