


8569000246
2. The Unit must be installed near a properly grounded electrical outlet with proper electrical require-
ments.The electrical circuit must be properly fused (slow-blow type fuse) or the circuit must be connected
through an equivalent HACR circuit breaker.The electrical outlet must be accessible for ease of connecting
and disconnecting the Unit power cord. No other electrical equipment should be connected to this circuit.
REFER TO UNIT NAMEPLATE FOR THE REQUIRED POWER CIRCUIT OPERATING VOLTAGE, HZ,
AND THE MINIMUM CIRCUIT AMPACITY OF THE UNIT. ALL ELECTRICAL WIRING MUST CONFORM
TO NATIONAL AND LOCAL ELECTRICAL CODES.
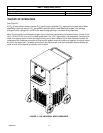
3. Unit not equipped with handle and wheels.
Close to a permaneant drain to route drip tray drain hose, water tank drain hose, and the water tank
overflow tube.
INSTALLATION
WARNING: The Unit must be electrically grounded to avoid possible fatal electrical shock
or serious injury to the Operator. The Unit power cord is equipped with a three-prong plug.
If a three-hole (grounded) electrical outlet is not available, use an approved method to
ground the Unit.
SEALING UNIT TO FLOOR REQUIREMENT (UNIT NOT EQUIPPED WITH HANDLE AND WHEELS)
To comply with NSF International (NSF) requirements within the United States, the Unit must be sealed to the
floor and all access holes to the Unit base must be closed and sealed. Proceed as follows to seal Unit base to
the floor.
1. Place Unit in operating position.
2. Tilt Unit up to expose bottom of it’s base.
3. Liberally apply silastic sealant such as Dow Corning RTV 731 or equivalent around edges on bottom of the
Unit base.
NOTE: Do not move Unit after positioning or seal from Unit base to the floor will be broken.
4. Lower Unit into operating position to complete seal from Unit base to the floor.
5. Apply additional sealant around bottom of the Unit base. Seal must have a minimum radius of 1/2–inch to
prevent crevices and to insure a complete seal.
FILL WATER TANK AND START REFRIGERATION SYSTEM
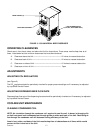
1. Remove four screws securing the Unit top cover, then remove cover.
NOTE: Use low-mineral content water where a local water problem exist.
2. Make sure plug is secure in end of water tank drain hose inside the Unit.
3. Route water tank overflow tube out through hole in back of Unit cabinet to a permanent drain.
4. Fill water tank with clean water until water starts flowing from the overflow tube into the permanent drain.
5. Install Unit top cover and secure with four screws.
WARNING: The Unit must be electrically grounded to avoid possible fatal electrical shock
or serious injury to the operator. The Unit power cord is equipped with a three-prong plug.
If a three-hole (grounded) electrical outlet is not available, use an approved method to
ground the Unit.