


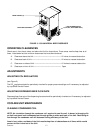


56900024619
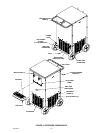
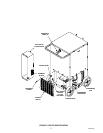
2. Remove four screws securing air intake grille on the Unit front panel, then remove the grille.
3. Vacuum or use a soft brush to clean the condenser coil. If available, use low-pressure compressed air.
4. Install air intake grille on the Unit and secure with four screws.
5. Plug Unit power cord into electrical outlet.
CHECKING ICE WATER BATH
A “gurgle’ heard from the Unit, indicates water level in the water tank is low and more water should be added for
maximum product cooling. Before adding more water to the water tank, the ice water bath and the ice bank
should be checked for cleanliness and the water tank components checked for excessive mineral deposit
build-up.
1. Unplug Unit power cord from electrical outlet.
2. Remove four screws securing the Unit top cover, then remove cover.
3. Check condition of the ice water bath and the ice bank. The ice water bath should be clear and the ice
bank should be free of foreign particles.
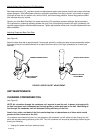
4. Check agitator motor shaft and ice bank sensing bulb for excessive mineral deposit build-up.
5. If cleaning of water tank is necessary, refer to CLEANING WATER TANK in this section for cleaning
procedure.
6. Make sure end of water tank overflow tube is placed in a waste container. Fill water tank with clean water
until water starts flowing from overflow tube into the waste container. USE A LOW-MINERAL-CONTENT
WATER WHERE A LOCAL WATER PROBLEM EXIST.
7. Install Unit top cover and secure with four screws.
8. Plug Unit power cord into electrical outlet. After water has stopped dripping from the water tank overflow
tube, remove tube from the waste container and place back inside the Unit.
CLEANING WATER TANK
NOTE: The ice water bath should be changed as often as necessary to keep the water tank clean. A
convenient time to perform this operation is at the time the Unit is being sanitized. To save time, water
can be drained from the water tank while the Unit is being sanitized.
1. Unplug Unit power cord from electrical outlet.
2. Remove screws securing the Unit top cover, then remove cover.
3. Remove four screws securing either the side or the back access grille, then remove the grille.
4. Route water tank drain hose out hole in back of the Unit to a waste container or to a drain.
5. Remove plug from end of the drain hose and allow water to drain from the water tank.
NOTE: If ice bank is clear and contains no foreign particles, it does not have to be melted down. Skip
steps 6, 7, and 8 and proceed with step 9 .
6. If ice bank is dirty, allow it to melt. Hot water may be used to speed up melting.
CAUTION: Never use an ice pick or other instrument to remove ice from the evaporator coil.
Such practice can result in a punctured refrigerant circuit or damage to the water tank.
7. Wash inside of the water tank with a mild soap solution.