


14189159000
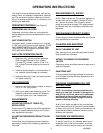
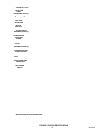
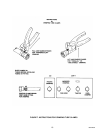
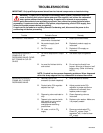
EVAPORATOR
TANK
ALUMINUM
SCREW
ANODE
AGITATOR
MOTOR
FIGURE 4. EVAPORATOR TANK (STANDARD UNIT SHOWN)
7. Fill evaporator tank with water up to top of stain-
less steel product coils. USE LOW--MINERAL--
CONTENT WATER WHERE A LOCAL WATER
PROBLEM EXISTS.
8. Unit with sealed evaporator tank only.
A. Install evaporator tank cover and coils line
fittings, connect agitator motor ground wire
and power cord, and connect product inlet
lines swivel nut connections to fittings on
evaporator tank cover.
B. Install quick disconnects (black) on product
tanks outlets.
C. Dispense from dispensing valves to bleed
air from systems.
D. Check for leaks and repair if evident.
9. Install unit top cover and secure with four
screws.
10. Flip unit power switch to ‘‘ON’’ (up) position.
CLEANING EVAPORATOR TANK (see Figure 4)
NOTE: Ice water bath should be changed as
often as necessary to keep evaporator tank
clean. A convenient time to perform this opera-
tion is at time unit is being sanitized. To save
time, water can be drained from the evaporator
tank while unit is being sanitized.
1. Flip power switch, on back of unit, to ‘‘OFF’’
(down) position.
2. Remove four screws securing unit top cover,
then remove cover.
3. Remove four screws securing either side or
back access grille, then remove grille.
4. Extend drain hose from bottom of evaporator
tank inside unit out through removed access
grille to waste receptacle or drain. Remove plug
and allow water to drain from evaporator tank.
5. Unit with sealed evaporator tank only.
Refer to step 3 CHECKING ICE WATER BATH
and perform procedures to disconnect product
tanks from systems, relieve systems pressures,
and remove evaporator tank cover.
NOTE: If ice bank is clear and contains no for-
eign particles, it does not have to be melted
down. Skip steps 6 and 7 and proceed with step
8).