


16189159000
WEEKLY CLEANING OF DISPENSING
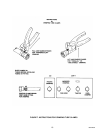
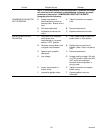
VALVES (see Figure 5)
Dispensing valves should be cleaned at least weekly
for proper operation. A convenient time to clean dis-
pensing valves is at time unit is being sanitized. Per-
form following procedure to clean dispensing valves.
1. Remove quick disconnects (black) from product
tanks outlets.
2. Open dispensing valves to relieve pressure on
systems.
3. Remove dispensing valve knobs by pulling
knobs up and off valves.
4. Using a spanner wrench, loosen and remove
coupling nuts from dispensing valves, then re-
move valves from unit.
5. Remove phillips--head screw on end of dispens-
ing valve, then remove outer sleeve, spring, and
inner sleeve.
6. Loosen and remove knob lever bonnet securing
lever in dispensing valve body, then remove le-
ver.
7. Slide shaft and seat assembly out through rear
of dispensing valve body.
8. Wash disassembled dispensing valve parts in
warm potable water.
9. Assemble dispensing valve by reversing disas-
sembly procedure steps 5 through 7 preceding.
10. Disassemble and clean remaining dispensing
valve by performing steps 5 through 9 preced-
ing.
11. Remove compensators from inside sleeve and
coupling nut assemblies.
12. Wash compensators in warm potable water,
then install compensators in sleeve and cou-
pling nut assemblies.
13. Install dispensing valves on unit. Make sure
coupling nuts are tight.
14. Install quick disconnects on product tanks out-
lets.
15. Open dispensing valves to bleed air from sys-
tems and until product flows from valves.
SANITIZING UNIT
NOTE: This unit should be sanitized every 90
days following Sanitizer Manufacturer’ s recom-
mendations. Use Chlor--Tergent (Oakite Prod-
ucts, Inc.) or equivalent sanitizer. An economic
practice would be to arrange any product flavor
changeover to coincide with sanitizing opera-
tion.
1. Remove quick disconnects from product tanks.
Rinse quick disconnects in potable water.
2. Following Sanitizer Manufacturer’s instructions,
fill clean empty product tank with sanitizing solu-
tion.
3. Connect tank containing sanitizing solution into
system to be sanitized.
4. Place waste container under applicable dispens-
ing valve. Open dispensing valve to permit sani-
tizing solution to push product out of line, coil,
and dispensing valve. Continue to draw from
valve until only sanitizing solution is dispensed.
5. Repeat steps 3 and 4 preceding to purge prod-
uct from, and install sanitizing solution in, re-
maining systems.
6. Follow Sanitizer Manufacturer’s application
instructions.
WARNING: To avoid possible
personal injury or property damage,
do not attempt to remove product
tank cover until CO
2
pressure has been
released from tank.
7. Remove tank containing sanitizing solution from
system and install tank containing potable wa-
ter.
WARNING: Flush sanitizing solution
from system as instructed. Residual
solution left in system could create a
health hazard.
8. Place waste container under dispensing valve.
Open dispensing valve to permit flush water to
purge sanitizing solution out of line, coil, and
dispensing valve. Continue to draw from valve
until only flush water is dispensed.
9. Install tank containing flush water on remaining
systems, then repeat step 8 preceding to flush
sanitizing solution from systems until only flush
water is dispensed.