


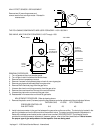
TRANSFORMER, TIME/TEMP. DISPLAY
1. Shut off power at the main breaker.
2. Remove conveyor.
3. Remove front control compartment cover.
4. Remove transformer wires and mark for replacement.
5. Remove 2 mounting screws and replace transformer.
6. Reassemble in reverse order.
TIME/TEMP. DISPLAY
1. Shut off power at main breaker.
2. Remove conveyor.
3. Remove front control box cover.
4. Mark all leads for proper reinstallation and then remove wires from all terminals at rear of the display.
5. Remove 2 screws from top of Time/Temp. case holding the case to the front panel.
NOTE: On some of the more recent Model 1100 units, the time/temp. display may now be removed. If it is
not free, continue.
6. Remove 3 screws from the front panel, lift up the front panel and remove 2 screws from the bottom of the
display case. Display should now be free to remove.
7. Replace in reverse order.
NOTE: BEFORE TURNING ON POWER, SET THE DIP SWITCHES TO THE PROPER SETTING.
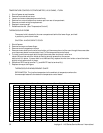
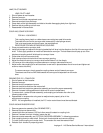
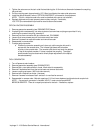
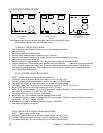
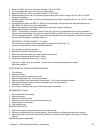
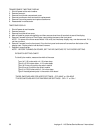
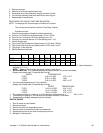
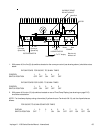
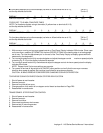
DIP SWITCH SETTING CHART:
To identify the module, measure the width of the case.
Type I is 5 1/8 inches wide x 4 1/2 inches deep
Type II is 5 5/8 inches wide x 4 1/2 inches deep
Type I & II have a 6 position dip switch module
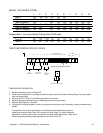
Type III has a 10 position dip switch module
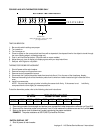
Type IV is 5 5/8 inches wide x 3 1/4 inches deep
Type IV has adjustment pots. in the center of the board
*THESE SWITCHES ARE FOR HERTZ SETTINGS - OFF=60HZ or ON=50HZ
**THESE SWITCHES ARE FOR TEMPERATURE SETTINGS - OFF=°F or ON=°
Impinger II - 1100 Series Service Manual - International60