19
SECTION 3 - SERVICING COMPONENTS
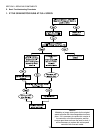
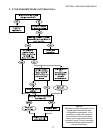
G. Conveyor Control Pickup Test
1. Visually check the pickup for the following:
The magnet is clean and the bearing is in good
condition.
There are no chips or cracks on the magnet.
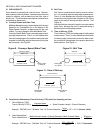
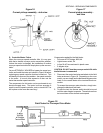
If using a PS350-style pickup (see Figure 14), there
is a 1/64 to 1/32 (0-4-0.8mm, or a business card
thickness) gap between magnet and hall device.
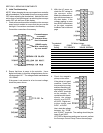
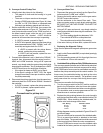
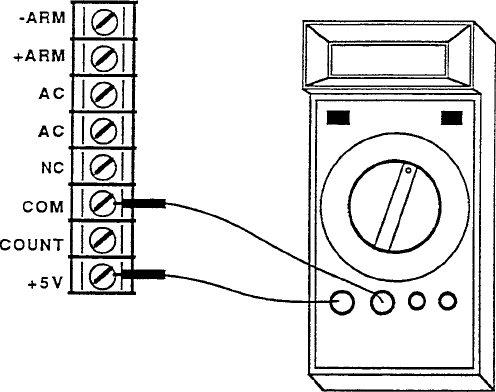
2 Set the multimeter to the VDC scale, then connect the
meter probes as shown in Figure 19. The black (-com-
mon) probe should connect to the COM terminal on
the speed control board, while the red (+VW) probe
connects to the +5V terminal. +5VDC should be
present at all times when the conveyor is operating.
If +5VDC is present, proceed to Step 3.
If +5VDC is not present, disconnect the three pickup
wires (connected to the COM, SIGNAL, and +5V
terminals) and again check for +5VDC.
- If +5VDC is present with the pickup discon-
nected, replace the pickup assembly.
- If +5VDC is still not present, replace the con-
veyor speed controller.
3. Connect the multimeters red (+) lead to the SIGNAL
terminal; then, disconnect the motor wires from the -
ARM and +ARM terminals. Using a 5/16 open-end
wrench, very slowly rotate the motor pickup shaft while
observing the multimeter. Two (2) changes from +5VDC
to 0VDC should occur for each motor revolution.
lf the signal is always at 0VDC, go to Step 4.
lf the signal is always at 5VDC, OR if the signal
changes more than 2 times per revolution, replace
the pickup assembly.
4. Disconnect the pickup signal wire from the speed con-
troller and check for +5VDC at the SIGNAL terminal of
the controller.
If +5VDC is present, replace the pickup assembly.
If 0VDC is present, replace speed control.
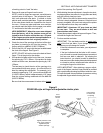
Figure 19
Connections for pickup test
H. Conveyor Motor Test
1. Disconnect the gear motor wires from the Speed Con-
troller terminals (-ARM and +ARM).
2. Remove the brush retainer caps from the gear motor.
DO NOT remove the brushes.
3. Set the multimeter to the lowest Ohm scale. Then,
place one meter probe on each brush retaining plate.
BE SURE THAT NEITHER PROBE TOUCHES THE
MOTOR CASING.
4. Using a 5/16 open-end wrench, very slowly rotate the
motor pickup shaft while observing the multimeter. Dur-
ing a 1/2 rotation:
The Ohm reading should stay betweeen 3-5W.
There should NEVER be a complete short.
There should never be a high Ohm reading.
If the motor fails any of these tests, replace the motor.
I. Replacing the Magnetic Pickup
If you need to replace the magnetic pickup on a gear motor
shaft:
1. Apply Loctite Removable #242 (or equivalent) sparingly
to the threads.
2. Turn the mounting screw until it is finger tight, then turn
it an additional 1/4 turn with a wrench.
J. Unshielded Pickup Wires on Early PS360-series ovens
The conveyor speed controller can be affected by electrical
noise transmitted by other electrical components or wiring.
Early PS360-series ovens used an unshielded connection
between the pickup assembly and the control module. On
these ovens, the unshielded wiring can pick up the noise
and transmit it to the control module. The problem is most
easily seen when the conveyor fails during burner spark
ignition.
There are two remedies for this problem:
1. Turn the conveyor switch to the OFF position, and then
back to the ON position, after the burner has ignited.
The controller should reset and allow normal operation.
This should be used as a stop-gap measure ONLY to
allow the oven to continue operation.
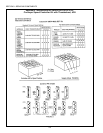
2. Replace the pickup wiring between the control module
and the terminal block with a new shielded cable (P/N
42400-0334). When installing the shielded cable, fol-
low the color code change shown here:
Old Wiring Shielded Cable
Brown Black
Orange Red
Yellow White
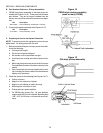
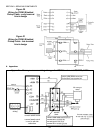
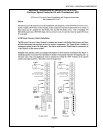
Wiring diagrams are also provided in Figures 20 and 21
on the next page.
There is a fourth lead on one end of the shielded cable.
This is a ground lead which is attached to the black
wire of the cable. The ground lead should be connected
to the terminal block inside the motor compartment.
Current PS360-series ovens have the shielded cable
installed at the factory and do not require this retrofit.


