


36
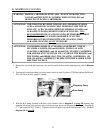
B. VENDING NOZZLE ADJUSTMENT
Dispensing nozzle can be adjusted to direct water into the center of the bay. Nozzles come from the factory
already adjusted. If flow is severely off center, it may indicate the machine is not level. Check machine before
adjusting nozzles.
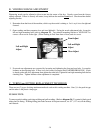
1. Determine from the front of the machine, which way the nozzle is aiming at. Let’s say it is too far right and
forward.
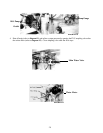
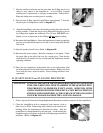
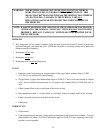
2. Open vending machine computer door and stand behind it. Facing the nozzle adjustment bolts, loosen the
left and right mounting bolts (refer to diagram 23). Tap solenoid mounting bracket to YOUR LEFT to
correct a flow too far to the right. (When looking at flow from front of door) and vice versa.
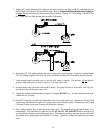
3. Front and rear adjustments are corrected by loosening and tightening the front and rear bolts. Loosen the
locknuts on the adjusting bolts. If flow is too far forward, loosen the bolt FARTHER FROM YOU. If bolt
is already at the end of its adjustment, then tighten the other bolt. Tighten left and right mounting bolts before
checking flow. Tighten locknuts when adjustment is completed.
C. TUBING and FITTING REPLACEMENT TECHNIQUE
There are two (2) types of tubing attachment methods used on this vending machine. One (1) is the push-in type
and the other is the plastic clamp type.
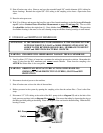
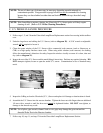
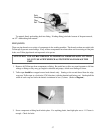
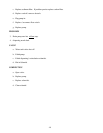
PUSH-IN TYPE:
To remove push-in tubing, push ring on fitting and pull on tubing. (Refer to diagram 24). To reattach, firmly push
tubing back in fitting. If tubing-fitting joint leaks because of frequent removal, cut 1/2” (1.27 cm) off the tubing
and reattach.
DIAGRAM 23
Front Adjust
Left and Right
Adjust
Rear Adjust
Left and Right
Adjust