


Operator’s Manual P/N-260AOZ-A
______________________________________________________________________________
9
2. To START the flow of steam, press the MANUAL end of
the MANUAL/TIMED rocker switch, located below the
timer. Steam immediately starts flowing into the
cooking compartment.
3. If inspection is required during steaming, refer to the
LIVE STEAM WARNING. Use extreme caution when
opening the steamer door during steaming operations.
4. Although the timer cannot turn the steam off in manual
mode, it can be used as a conventional cooking timer.
Refer to the timer setting instructions under Automatic
op-era don and set the timer The timer will count down
the set period and sound the buzzer, but WILL NOT
TURN OFF THE STEAM AFTER THE ALARM
SOUNDS.
5. To STOP the flow of steam, press the of the
MANUAL/TIMED rocker switch. Steam stops flowing
into the cooking compartment.
Automatic Cooking Operation -
Key Pad Controls
Each Convection Steamer cooking compartment is
equipped with an independent electronic digital timer,
which has a maximum setting of 99 minutes and 99 sec-
onds. Each timer is connected to a temperature-sensing
device in the cooking compartment. THE SENSOR Circuit
ALLOWS THE TIMER TO COUNT DOWN ONLY WHEN
THE COOKING COMPARTMENT IS AT THE PROPER
COOKING TEMPERATURE. This assures uniformity in
the cooking times as the timer automatically compensates
for food product defrosting and! Or heat-up time.
1. Place the pan(s) of food into the cooking compartment.
2. Clear and reset the timer. The timer can be set only
when the COOKING ~ME display is clear Press the
CLEAR key on the number pad to zero the timer
3. Set the Desired Cooking Time. The cooking time dis-
play contains four digits. The left two digits are min-
utes, and the right two digits are seconds. The display
12:34 is set for 12 minutes and 34 seconds.
a. To set the cooking time: change the required
cooking time to minutes and seconds, press the
number keys for the minutes, and then press the
number keys for the seconds. If the cooking time
is 99 seconds or less, only press the number keys
for seconds.
b. Example 1. To set the timer for 1 hour and 15
minutes: Change 1 hour (60 min) and 15 minutes
to 75 minutes. Press the following number keys in
sequence: 75 00.The display will read 75:00 when
properly set for 1 hour and 15 minutes.
c. Example 2. To clear the time numbers set in
example 1, press the CLEAR key on the number
pad. The display returns to 00:00.
d. Press the following number keys in sequence: 1 3
0. The display will read 01:30, when set for 1.5
minutes. All seconds method: Change the 1.5
minutes to 90 seconds and press 90. The display
will read 00:90, when set for 1.5 minutes.
4. Press the START/STOP key to start the timer. When
the START/STOP key is pressed, steam enters the
cooking compartment.
a. THE TIMER WILL BEGIN TO COUNT DOWN
ONLY AFTER THE COOKING COMPARTMENT
REACHES PROPER COOKING TEMPERATURE.
The timer automatically delays to compensate for
Defrosting and! Or food product heat-up time.
b. For example, a timer setting of 10 minutes may in
fact take 11 or 12 minutes for the time to count
down and the alarm to sound. This is normal.
Heating the compartment and food to cooking
temperature uses the additional time.
c. To stop or reset the timer, press and hold the
START! STOP key. The cooking time display
returns to the last time setting.
• To restart the same time, press the START/STOP
key.
• To set a new time, press the CLEAR key, and set
the time.
5. When the timer counts down to zero, an alarm
Sounds continuously. Press the START/STOP key to
silence the alarm. The cooking time display returns to
the last time setting. Either run this same setting
again or clear and reset the timer
6. Example 4. To cook two 14 minutes cycles: Press the
CLEAR key to clear the timer Press the following num-
ber keys in sequence: The display shows 14:00. Press
the START/STOP)? Key to start the timer. When the
display counts down to zero, the alarm sounds. Press
the START/STOP key, and the display returns to
14:00. Press the START! STOP key to start the second
14-minute cycle.
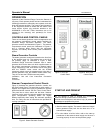
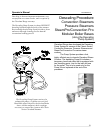
Cooking Operations for
The Dial Timer Control Panel
The dial timer control panel is illustrated in Figure 4