


9
Installation Instructions
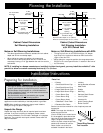
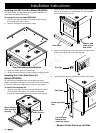
Changing the Backguard (Models ER30D and
ER30D-C)
Models ER30D and ER30D-C come standard with a 3” backguard
installed. The 6” and 9” backguards are optional.
To change the backguard:
Remove and retain the three (3) chrome screws on the front
of the existing backguard.
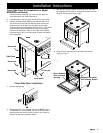
Loosen the upper screws on the back of the side panels.
Slide the existing backguard off the unit.
Place the new backguard over the back of the range.
Fasten the backguard using the existing screws.
Tighten the upper screws on the back of the side panels.
1.
2.
3.
4.
5.
6.
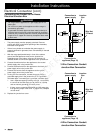
Backguard Installation
Loosen Screw
2 Places
New Backguard
Height Varies
Tighten Screw
2 Places
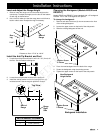
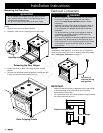
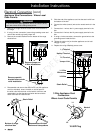
Level and Adjust the Range Height
Raise or lower the range until it is the same height as the
counter-top. To adjust the height, turn the foot on the bottom
of each leg as shown below.
Use a level to make sure that the range does not tilt front to
back or side to side. Readjust the legs if necessary.
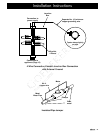
Install the Anti-Tip Bracket and Foot
Locate the anti-tip foot and lower it until it is 1/16" (2 mm) off
the floor. See the bottom left diagram.
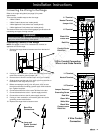
Locate the anti-tip bracket included in the parts box.
Install the anti-tip bracket on the floor using the four (4)
included screws. See the diagram below for location.
ANTI-TIP BRACKET PLACEMENT
H 6 5/8” (168 mm)
J 6 3/8” (162 mm)
1.
2.
1.
2.
3.
H
J
Top View
Back of
Range
Range
Right
Side
Back of
Range
2 1/8” *
down
up
Rear
Leg
* Distance to floor: 2 7/16” to 4 9/16”
Back of Range