


20
Installation Instructions
Installation Checklist
WARNING
To ensure a safe and proper installation, the following
checklist should be completed by the installer to ensure that
no part of the installation has been overlooked.
Proper installation is the responsibility of the homeowner.
The importance of proper installation of your Dacor range
cannot be overemphasized.
•
•
Has the plastic coating been peeled off of the outside
of the range? Have all packaging materials been
removed from inside the oven?
Are all leveling legs extended down to make contact
with the floor? Is the unit level? See Page 9.
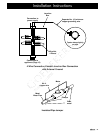
Is the range secured in place with the provided anti-tip
bracket and foot according to these instructions? See
Page 9.
If the wall in back of the cooktop is combustible, is a
backguard or raised vent installed?
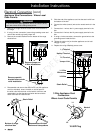
Is the range wired and grounded according to these
instructions and in accordance with all applicable
electrical codes? Has the electrical access cover been
replaced? See Pages 3 and 12 to 17.
Has the gas supply inlet pressure been measured to
ensure that it does not exceed the maximums stated in
these instructions? See page 4.
Is the range connected to the gas supply according to
these instructions and in accordance with all applicable
codes? See page 17.
Did the installer check the gas supply for leaks?
Is the oven door properly installed according to these
instructions? See page 18.
Have the burner knobs been installed in the proper
positions? See page 18.
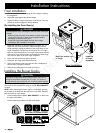
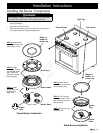
Are the burners and grates properly installed according
to these instructions? See page 19.
Has proper operation been verified?
Have any problems been noted on the warranty card
or during the on-line activation? Has the warranty been
activated on-line or the warranty card been filled out
completely and mailed?
□
□
□
□
□
□
□
□
□
□
□
□
□
Verifying Proper Operation
Prior to operating the cooktop or oven, please read the
accompanying use and care manual completely. It contains
important safety, service and warranty information.
Before beginning the test procedure, ensure that all cooktop
control valves are in the “OFF” position, and all burner rings,
burner caps, and grates are properly positioned on the
cooktop frame. Turn on the gas supply at the shut-off valve.
Plug in the appliance cord, if applicable. Turn on power to the
range at the circuit breaker or fuse box.
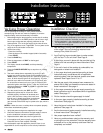
Set the time of day:
- Press the clock key.
- Enter the time on the number keypad (within 6 seconds).
- Press START.
Press the BAKE key.
Enter the temperature of 350°F on the keypad.
Press START.
The display should show BAKE, and the preheating
temperature.
Press the CANCEL-SECURE key to stop the oven heating
process.
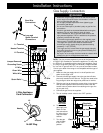
Test each cooktop burner separately by pushing in and
turning one control knob at a time counterclockwise to the
“HIGH” position. It may take up to four seconds for ignition to
occur, at which time the ignitor will stop sparking. If ignition
does not occur within four seconds, turn off the knob, wait
for at least five minutes to allow any gas to dissipate, then
repeat the ignition test. After ignition, rotate the control knob
counterclockwise from “HIGH” to “LOW” to adjust the flame
height progressively.
Turn the control knob to the “OFF” position.
Repeat the ignition test for all burners. When
installed properly, the flame will be steady and
quiet. It will also have a sharp, blue inner cone
that will vary in length proportional to the burner
size. If the range is equipped for use with LP
gas, the ends of the flame may be yellow at the tips, which is
normal.
NOTES: If either the oven or cooktop does not operate properly,
follow these troubleshooting steps:
Verify that power and gas are supplied to the range.
Check the electrical connections and gas supply to ensure
that the installation has been completed correctly.
Repeat the above bake test or burner ignition test.
If the appliance still does not work, contact the Dacor
Customer Service Team at (800) 793-0093.
Do not attempt to repair the appliance yourself. Dacor is not
responsible for service required to correct a faulty installation.
1.
2.
3.
4.
5.
6.
7.
8.
9.
10.
11.
1.
2.
3.
4.
OFF Icon