


24G SERIES FLATBOTTOM GAS FRYERS
CHAPTER 1: SERVICE PROCEDURES
1-28
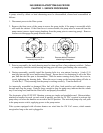
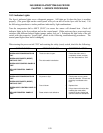
1.9.3 Indicator Lights
The fryer’s indicator lights serve a diagnostic purpose. All lights are lit when the fryer is working
properly. (The green light on the control panel will cycle on and off as the fryer calls for heat). Use
the following procedures to isolate problems indicated by light combinations.
Turn the temperature dial to 400°F (204°C) to ensure the sensor will demand heat. Check all
indicator lights in the fryer cabinet and on the control panel. [Older units may have power and reset
switches with different colored lights (orange, amber, red, etc.). Substitute the light color of the old
switch with the respective "green light" switch in the following troubleshooting procedures. The
control panel light colors haven’t changed.]
When turning the power switch "ON" and resetting the safety (reset) switch, check for the following:
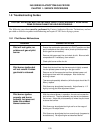
LIGHT INDICATION PROBABLE CAUSE CORRECTIVE ACTION
GREEN LIGHT/POWER SWITCH IS
"ON"
GREEN LIGHT/SAFETY (RESET)
SWITCH IS "OFF"
GREEN LIGHT/CONTROL PANEL IS
"OFF"
RED LIGHT/CONTROL PANEL IS
"OFF"
1. The drain valve is open.
2. The drain switch is defective.
1. Ensure the drain valve is
completely closed, and then
turn the reset switch to "ON".
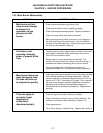
GREEN LIGHT/POWER SWITCH IS
"OFF"
GREEN LIGHT/SAFETY (RESET)
SWITCH IS "OFF"
GREEN LIGHT/ CONTROL PANEL IS
"OFF"
RED LIGHT/CONTROL PANEL IS
"OFF"
1. No power to fryer.
2. Fuse is blown.
3. Reset switch circuit defective.
1. Check power source, power
cords and breaker. Ensure that
electricity is available to the
fryer.
2. Replace fuse.
3. If fryer does not function after
resetting the reset switch,
contact a Factory Authorized
Service Center for assistance.