


PrecisionSwirl Module Operation
310554V 23
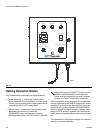
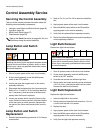
Using Automatic Mode
Entering Automatic Mode
To put the PrecisionSwirl module into Automatic mode:
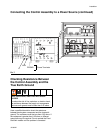
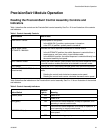
1. Make sure the POWER indicator, shown in F
IG. 12,
is lit at the control assembly. If it is not, turn the
MAIN power switch to the ON position, turning on
power to the PrecisionSwirl control assembly cir-
cuitry.
2. Set the CONTROL SELECT switch to AUTOMATIC.
3. Press the RUN/ENABLE (black) button. Make sure
the green RUN indicator, shown in F
IG. 12, is lit at
the control assembly.
The PrecisionSwirl orbital dispenser is now enabled.
When it receives a 24 Volt RUN/ENABLE command
from the robot, the PrecisionSwirl orbital dispenser
motor starts and reaches full speed in about one sec-
ond. The orbital dispenser motor stops when the 24 Volt
RUN/ENABLE command is removed.
4. Leave the control assembly in this state during nor-
mal operation.
Leaving Automatic Mode
To leave Automatic dispense mode and idle the module:
1. Press the STOP (red) button.
2. Set the CONTROL SELECT switch to MANUAL.
3. Make sure the green RUN indicator, shown in
F
IG. 12, is off at the control assembly.
Using Manual Mode
1. Make sure the POWER indicator, in FIG. 12, is lit at
the control assembly. If it is not, turn the MAIN
power switch to the ON position, turning on power to
the PrecisionSwirl control assembly circuitry.
2. Set the CONTROL SELECT switch to MANUAL.
3. Press the RUN/ENABLE (black) button. Make sure
the green RUN indicator, shown in
F
IG. 12, is lit at the control assembly.
The PrecisionSwirl orbital dispenser motor starts imme-
diately.
Stop Manual Swirling
To stop manual swirling and idle the module:
1. Press the STOP (red) button.
The PrecisionSwirl orbital dispenser is now disabled and
will stop swirling material.
2. Make sure the green RUN indicator, shown in
F
IG. 12, is off at the control assembly.
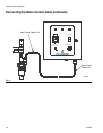
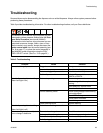
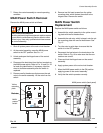
Analyzing Causes for a Motor
Fault Alarm
Circuitry on the relay board monitors the motor speed to
verify that the motor is functioning properly.
When the motor functions improperly, the circuitry on
the relay board activates the motor fault alarm. The
alarm turns on when:
• the motor speed has not risen within the +/-50% tol-
erance range within five seconds after startup.
• the motor speed is outside the tolerance range for at
least five seconds while operating.
When a fault occurs, the motor fault light on the control
panel illuminates, and the alarm relay activates sending
the fault signal out via the automatic control cable. The
alarm remains turned on until the fault condition is cor-
rected or the run command is removed.
A fault will also be generated if any of the front panel
controls are not in the correct position for automatic
operation (power switch, enable switch, manual/auto
switch).
You are about to place the system under robotic
control. Make sure dispensing will not endanger
people or equipment before proceeding.
The system is now ready to dispense. Make sure
dispensing will not endanger people or equipment
before proceeding.