


– 4 –
Installation and Care Of
FT1000 SERIES DISHWASHERS
SAVE THESE INSTRUCTIONS
GENERAL
NOTES FOR THE INSTALLERS
Read the entire manual before installing the machine.
1. Do not use a forklift to move or unskid machine sections.
2. Do not throw out any loose parts. These may be required for installation or
operation.
3. Electrical Connections:
• Make sure line voltage matches the machine data plate located on the
control box.
• Make sure wiring connections to terminal block match the diagram inside
the control box door.
• Make sure the pilot circuit transformer is set to the correct voltage. Refer to
Voltage Adjustment, page 24.
4. Level the center section in operation position. Center section must be level
end to end and front to back. Refer to Leveling the Center Section, page 7.
5. Conveyor: Refer to the Conveyor Assembly section, page 29. After installation,
the conveyor must run continuously for 15 minutes and then be checked
for alignment. Adjust if necessary and rerun for another 15 minutes. Then
recheck alignment and retighten locknuts on take-up unit when nished.
6. Make sure all curtains are in proper operating positions. Refer to Curtain section,
pages 36-37.
7. Check all water and steam unions for tightness.
8. Regarding drain installation, make sure that drain piping is free of any leaks.
9. Give the Operation Manual to the owner.
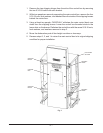
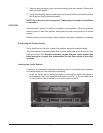
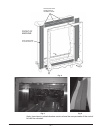
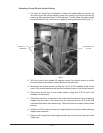
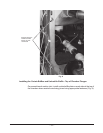
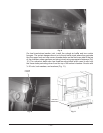
HOW TO REDUCE THE CLEARANCE HEIGHT OF THE CONTROL BOX DURING MOVE-IN
This procedure will reduce the overall height of the control box by 4-1/2” to allow it
to travel through a low-height corridor or doorway.
The control box must be securely supported by at least two
people while its mounting studs are being shifted to lower slots of the shipping
braces.
The rear of the main control box is attached to the two shipping braces on the dual
rinse/nalrinsesectionbyfour5/16-18threadedstuds,washers,lockwashers,
and nuts. The shipping braces have slots that allow the control box to be lowered
by 4-1/2”. (Fig. 1).