


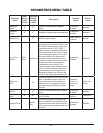
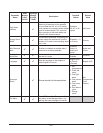


– 28 –
CLEANING
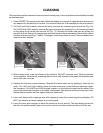
This machine must be cleaned at least once each working day. Use only products formulated to be safe
on stainless steel.
1. Press POWER. The machine will drain. When the display is no longer lit, open the door and remove
any debris from the bottom of the tank. Do not allow food soil to accumulate on the tank bottom.
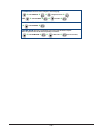
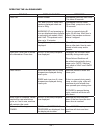
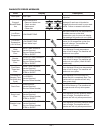
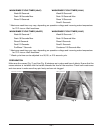
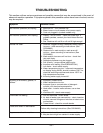
2. On LXeC and LXeH models, remove the lower rinse arm by unscrewing the thumb nut (Fig. 10).
On LXePR and LXeR models, remove the lower rinse arm by pressing in on the buttons located
on the sides of the center hub and pull off (Fig. 11). Remove the lower wash arm by pulling the
arm off the shaft. Remove the upper rinse and wash arms in the same manner. Remove the coarse
and ne strainers (see Figs. 7 and 8). Thoroughly clean these items in a sink. Remove debris from
wash/rinse arm nozzles.
3. With a damp cloth, wipe the interior of the machine. DO NOT use steel wool. Wipe the exterior
of the machine. Remove any remaining debris with a mild cleanser formulated for stainless steel
and a soft cloth or brush.
4. Replace the ne and coarse strainers. Reinstall the lower wash arm by pushing it down on the
shaft. On LXeC and LXeH models, place the lower rinse arm on the shaft and securely tighten
the thumb nut. On LXePR and LXeR models, press in on the buttons located on the sides of the
center hub, place the rinse arm on the shaft, and release. Spin arms to make sure they spin freely.
Repeat this procedure with the upper wash and rinse arms.
5. Use a soft, damp cloth or sponge and mild cleanser to clean the control keypad and display. DO
NOT use abrasive or harsh cleaners or scouring pads.
6. Leave the door ajar overnight to allow the interior to air out and dry. The door design allows for
the door to remain partially open and can be used to vent the machine at the end of the day.
Fig. 10 Fig. 11
THUMB NUT
(LXeC & LXeH)
RINSE ARM
CENTER HUB
BUTTONS
(LXePR & LXeR)