


1-4
WARNING
DO NOT obstruct the flow of combustion/ventilation or air openings around
the fryer. Adequate clearance around the fryer is necessary for servicing and
proper burner operation. Ensure that you meet the minimum clearances
specified in the installation instructions.
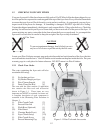
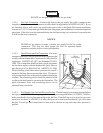
c. When properly installed the angled section of the heat deflector will extend over the flue
opening to redirect the heat. It SHOULD NOT cover the flue opening. Nothing should
block the flue opening as this will cause the fryer to overheat and produce dangerous
gases.
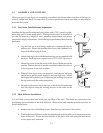
1.3.3 Basket Lift Access
The basket lift mechanisms are installed at the factory and do not need adjustment. If it becomes
necessary to gain access to the basket lift motors or linkage, the rear panel of the fryer must be
removed. The motors do not require lubrication but the mechanism linkage may. Refer to the
maintenance section for instructions on basket lift lubrication.
1.3.4 Assembling Multi Fryer Systems
If you purchased a multi-fryer unit it could be shipped in more than one piece. To assemble the unit
follow the instructions below.
a. Unpack the units and move them close together. Remove the front panels and both heat
shields from the fryers.
b. There are five joining strips to be attached to the units to make them into one system.
These strips are attached in the rear, front, upper front, and the forward and rear caster
mount. Use the screws supplied with your system to attach the strips. Secure them tightly
to each unit.
c. Connect the filter return piping and the drain manifold. If possible test the pipes for leaks
before completing the installation.
d. Replace the heat shield and front panels to complete the system assembly.
1.4 INSTALLATION
Although it is possible for you to install and set up your new fryer, it is STRONGLY recommended
that you have it done by qualified professionals. The professionals that install your new fryer will
know the local building codes and ensure that your installation is safe.