


3-9
3.3 INSTALLING THE OPTIONAL FLUSH HOSE
The flush hose option allows you to rinse out the fryer tank during shortening filtration. This option
can be installed by the owner but it is recommended that you consult a qualified technician if you have
any problems. The hardware necessary to install the flush hose option is listed below. Install the flush
hose option as described in the procedures.
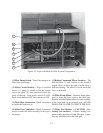
1 Flush Hose Assembly (B6602501) 1 Valve Handle (PP10050)
1 UFM Flush Hose Connection (B6603101) 1 3/8" Valve (P6071780)
1 Quick Disconnect - Black (B7402241) 1 Plate for Label (A6643402)
1 3/8" Street Elbow - Plated (P7037752-1) 1 Label (PP10057)
2 3/8" Close Nipple (P7037301) 1 3/8" Tee (P7036854)
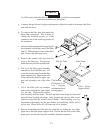
a. Remove the old 3/8" street elbow and male quick-disconnect that connects the filter return
hose to the filter. Put the quick disconnect aside as you will need it later.
b. Install the tee on the pipe where the elbow was. Install a close nipple in each of the tee's
remaining openings.
c. Attach the previously removed male quick-disconnect on the right tee opening. Install
the 3/8" valve, plate, and label on the left tee opening.
d. Install the long nipple in the 3/8" valve and the female quick-disconnect on the long
nipple.
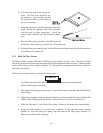
e. Connect the filter unit to the quick disconnect and the flush hose to the flush hose quick
disconnect. During normal operation of the fryer, the yellow handle flush valve will be
SHUT. Only open the flush valve during the filter procedures described in 2.4.
3.4 FLUE INSPECTION
It is recommended that once every six monts, with the cooker cooled down, you examine the flue area.
Check for corrosion or blockage of the flue. Ensure that the cooker is shutdown and do not turn it on
during the examination. Examination of the flue area during cooking may cause bodily injury.
3.5 BASKET LIFT LUBRICATION
The basket lift motors and linkages do not need lubrication. Oil impregnated bearings are used to avoid
the need to lubricate these components.