


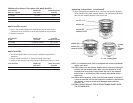
repas à 3 niveaux :
blanc de poulet sucré salé
2 blancs de poulet désossés et sans peau
Sel aux épices Lawrey’s®
1 verre de riz blanc à longs grains
1 verre un quart d’eau
1/2 petit oignon tranché finement
1/2 petit poivron tranché
110 g de champignons tranchés
1 boîte de châtaignes d’eau égouttées
1/2 verre de pousses de soja fraîches (ou une boîte de 140 g de pousses
de soja égouttées)
1 verre d’ananas séché confit
sauce sucrée salée
1 cuillerée à soupe de sauce au piment
1/2 verre de gelée de raisins
1. Assaisonner les blancs de poulet au sel aux épices, puis les placer dans
le panier inférieur. Mettre le panier solidement en place sur le socle.
2. Placer le riz et l’eau dans le panier de cuisson du riz. Mettre le panier
central solidement en place sur le panier inférieur, puis ajouter le
panier de cuisson du riz.
3. Mettre l’oignon, le poivron vert, les champignons, les châtaignes
d’eau, les pousses de soja et l’ananas séché dans le panier supérieur.
Mettre le panier supérieur solidement en place sur le panier central,
puis mettre le couvercle.
4. Régler la minuterie sur 45 minutes. Vérifier la cuisson de l’ensemble
des ingrédients. Continuer la cuisson au besoin.
5. Mélanger la sauce au piment et la gelée de raisins. Faire chauffer au
micro-ondes jusqu’à ce que le mélange devienne chaud. Bien mélanger.
6. Disposer le riz sur un plateau. Ajouter les blancs de poulet et les
légumes. Verser la sauce sucrée/salée sur le poulet au moment de
servir. Saupoudrez 3 cuillerées à soupe de graines de sésame sur le
plat en fonction de vos préférences.
41
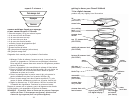
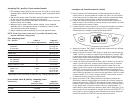
Légumes et ananas
Panier de cuisson du riz
Poulet
2
Additional Important Safeguards
CAUTION HOT SURFACES: This appliance generates heat and escaping
steam during use. Proper precautions must be taken to prevent
the risk of burns, fires, or other injury to persons or damage
to property.
1. A person who has not read and understood all operating and safety
instructions is not qualified to operate this appliance. All users of
this appliance must read and understand this instruction manual
before operating or cleaning this appliance.
2. If this appliance falls or accidentally becomes immersed in water,
unplug it from the wall outlet immediately. Do not reach into
the water!
3. When using this appliance, provide adequate air space above and on
all sides for air circulation. Do not operate this appliance while it is
touching or near curtains, wall coverings, clothing, dishtowels or
other flammable materials.
4. To reduce the risk of fire, do not leave this appliance unattended
during use.
5. If this appliance begins to malfunction during use, immediately
unplug the cord. Do not use or attempt to repair the malfunctioning
appliance!
6. The cord to this appliance should only be plugged into a 120V AC
electrical wall outlet.
7. Do not use this appliance in an unstable position.
8. Do not use the food steamer if the drip tray or steamer base, or if
any steamer bowl is cracked or damaged.
9. Make sure the food steamer is unplugged and the steaming water has
cooled before transporting or cleaning.
10. Never plug the food steamer in until you: snap the steam ring into
position around the heat element. Next, fill the steamer base with
water and then place the drip tray inside the steamer base.
11. To avoid burns, keep hands and face clear of the lid’s steam vents
during cooking.
WARNING: Steam is hot and can cause burns. Keep hands and face
away from vents in the lid. Use protective oven mitts to remove
steamer bowls from the base and to lift the lid. When removing
the lid after steaming, always tilt lid away from your face to avoid
burns caused from steam.
12. The steamer base and components are not for use in ovens
(microwave, convection or conventional) or on stove-top.
CAUTION: While steaming, make sure the food steamer is placed in a
secure area that will not be bumped or pushed or disturbed in any
manner.
13. Make sure the bottom (B) steamer bowl is securely sitting in position
on the steamer base. Make sure the bottom of every stacked bowl is
securely locked into the tabs and grooves along the top rim of the
steamer bowl below it, and that the food is contained and evenly
distributed within each bowl. Make sure the lid is properly affixed
before pressing the START/OFF button to begin steaming.