


35
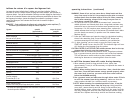
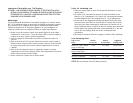
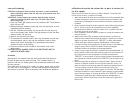
tableau de cuisson à la vapeur des légumes frais
Les temps de cuisson indiqués dans le tableau ont une valeur indicative. Régler la
minuterie et vérifier la cuisson au bout du temps de cuisson conseillé, puis continuer la
cuisson au besoin. Il est parfois nécessaire d’effectuer certains réglages en fonction de la
taille et de la forme des aliments ainsi que des préférences personnelles de chacun. Pour
des légumes plus tendres, ajouter davantage d’eau au besoin et prolonger la cuisson
vapeur. Ne laissez pas l’eau contenue dans le socle de la marmite s’évaporer
intégralement.
REMARQUE : Il est possible que les aliments qui cuisent dans le panier supérieur (T)
ou central (M) nécessitent un temps de cuisson supérieur.
légumes quantité temps de cuisson*
(approximative) conseillé
Artichauts entiers 3 de taille moyenne, en coupant le haut 50 à 55 mn
Pointes d’asperges 450 g 20 à 25 mn
Haricots verts ou jaunes
coupés ou entiers 45 à 55 mn
Pousses de brocolis 225 à 450 g 35 à 45 mn
Fleurons 225 à 450 g 20 à 25 mn
Choux de Bruxelles 450 g 25 à 30 mn
Chou en tranches de 3 cm d’épaisseur 1 tête 45 à 50 mn
Carottes en morceaux de 5 cm 450 g 25 à 30 mn
Chou-fleur 1 de taille moyenne coupé en morceaux 35 à 40 mn
Inflorescences 225 à 450 g 35 à 40 mn
Épis de maïs 3 de petite taille 35 à 45 mn
Champignons entiers 450 g 10 à 15 mn
Panais entiers 450 g 40 à 50 mn
Pommes de terre nouvelles entières 900 g 45 à 55 mn
Rutabaga en quartiers 450 g 55 à 65 mn
Épinards 340 g 10 à 15 mn
Courge d’été
jaune et courgette
En tranches de 1,2 cm 450 g 10 à 15 mn
Navets tranchés en deux 450 g 45 à 60 mn
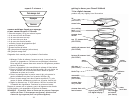
Potiron tranché en deux
ou écorce vers le haut pour qu’il loge dans le panier
1 potiron 30 à 50 mn
*Les temps de cuisson approximatifs sont mentionnés uniquement à titre indicatif. Le temps
de cuisson peut être différent.
8
WARNING: Steam is hot and can cause burns. Keep hands and face
away from vents in the lid. Use protective oven mitts to remove
steamer bowls from the base and to lift the lid. When removing
the lid after steaming, always tilt lid away from your face to
avoid burns caused from steam.
16. To check the food in the bottom (B) steamer bowl, remove the
middle (M) bowl and lid and place onto a large heat-resistant tray,
protective mat or place onto a kitchen towel spread out over your
countertop. If it still requires more steaming time, replace the
middle steamer bowl on top of the bottom (B) steamer bowl. Make
sure the bowls are securely in position over the steamer base.
Replace the lid.
17. Press the TIME Button and reset the timer for the desired cooking
time of the remaining food. Press the START/OFF button and
continue steaming until all food is cooked to your satisfaction.
18. If, after checking, you are ready to serve the food, press the
START/OFF button to turn the unit OFF. The indicator light will turn
off. Unplug the food steamer from the outlet.
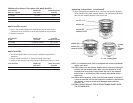
CAUTION: NEVER PLACE EITHER THE middle steamer bowl or the top
steamer bowl directly onto the steamer base.
suggestion: Place an outstretched kitchen towel, large heat-resistant
tray, or protective mat onto the counter next to the food steamer.
This will become a useful surface to place steamer bowls when
checking for doneness or removing bowls from the stack.
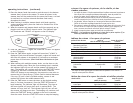
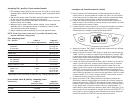
to refill the steamer base with water during steaming
1. When steaming foods for long periods of time, (more than
approximately 1 hour) it will be necessary to replenish the water in
the steamer base.
WARNING: When cooking foods for more than 1 hour, check the water
level lens. Since the food steamer cannot operate properly when
the water level is too low, you must refill when water reaches
below the MINIMUM marking.
2. Use a spouted vessel and add water through either water fill hole
to refill the steamer base during steaming . Make sure that the
water reaches the MAX line. Add more water as necessary.
3. NOTE: When steaming for extended periods of time, it may be
necessary to remove water from the drip tray. Using protective
oven mitts, remove bowl(s) and lid. Using a heat-resistant long
handled ladle or spoon, remove the majority of the water from the
drip tray, making sure that the water level always remains close to
the MAX line. Replace the bowl(s) with lid and continue cooking.
operating instructions (continued)