


17
Model 142 Operating Procedures
140718
Draining Product From the
Freezing Cylinder
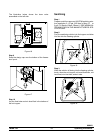
Step 1
Place the toggle switch in the OFF position as far
ahead of cleaning time as possible to allow frozen
product to s often for easier cleaning.
Step 2
Lift the hoppercover,remove thefeedtube andthemix
level float. Take these parts to the sink for c leaning.
Step 3
If local health codes permit the use of rerun,place
a sanitized, NSF approved stainless steel rerun
container beneath the door spout. Place the toggle
switch in the WASH position and open the draw valve.
When all the product stops flowing from the door
spout, close the draw valve. Place the toggle switch in
the OFF position. Place a sanitized lid on the rerun
container and place it in the walk- in cooler.
(Note: For additional information regarding the proper
use of rerun, see item 5 on page 19.)
Note: Iflocal health codes DO NOTpermit theuse
ofrerun, the productmustbediscarded. Follow the
instructions in the previous step, except dr ain the
product into a pail and properly dis card the mix.
ALWAYS FOLLOW LOCAL HEALTH CODES.
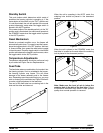
Rinsing
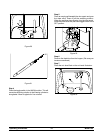
Step 1
Pour onegallon (3.8 liters) of cool, cleanwater into the
mix hopper. With the brushes provided, scrub the mix
hopper, mix level float s tem and mix inlet hole.
Step 2
With a pail beneath the door spout, place the toggle
switch in the WASH position and open the draw valve.
Drain all the rinse water from the freezing cylinder.
When the rinse water stops flowing from the door
spout, close thedrawvalve andplacethe toggle switch
in t he OFF position.
Repeat this procedure until t he rinse water being
drawn from t he freezing cylinder is clear.
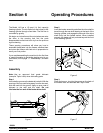
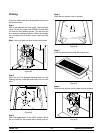
Cleaning
Step 1
Prepare a pail of an approved 100 PPM cleaning solu-
tion (examples: 2- 1/2 gal. [9.5 liters] of Kay- 5R or
2 gal. [7.6 liters] of Stera- SheenR). USE WARM WA-
TER AND FOLLOW THE MANUFACTURER’S SPE-
CIFICATIONS.
Step 2
Pour the cleaning solution into the mix hopper and
allow it to flow into the freezing c ylinder.
Step 3
While the solution is flowing into the freezing cylinder,
brush clean the mix hopper, mix level float stem and
mix inlet hole.
Step 4
Place the toggle switch in the WASH position. This will
cause the cleaning solution in the freezing cylinder to
be agit ated.
Step 5
Place an empty pail beneath the door spout and open
the draw valve. Draw off all the cleaning s olution.
When the solution stops flowing from the door spout,
close the draw valve and place the toggle switch in the
OFF position.
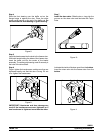
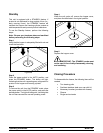
Disassembly
Step 1
MAKE SURE THE TOGGLE SWITCH IS IN
THE “OFF” POSITION TO ELIMINATE THE
CHANCE OF MOVING PARTS.
Step 2
Remove the handscrews and freezer door. Remove
the beater assembly from the freezing cylinder and
take these par ts to the sink for cleaning.
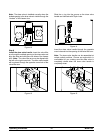
Step 3
Remove the splash shield from the freezer and take to
the sink for cleaning.
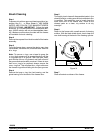
Step 4
Remove the rear drip pan from the front panel. Take it
to the sink for cleaning.
Note: If the drip panis filled with anexcessiveamount
of mix, this is an indic ation that the drive shaft o- ring
of the beater assembly should be replaced or
lubricated pr operly.