


Model 2002 page 7
SECTION 2
Installation
This section is designed to assist in getting a new pressure gauge into operation as quickly and
easily as possible. Please read the following instructions thoroughly before installing the instru-
ment.
2.1 Receiving Inspection
Carefully unpack the Hastings Model 2002 Instrument (part # HPM-2002), transducer (part
#HPM-2002s) and cable (part # CB 2002). Inspect all items for any obvious signs of damage
due to shipment. Immediately advise the carrier who delivered the shipment if any damage is
suspected.
Compare each component shipped against the packing list. Ensure that all parts are present (i.e.
transducer, power supply, cables, etc.). In addition to the components listed on the packing list,
the shipment includes: AC power cord, panel mounting hardware, 9-pin female D connector.
Optional equipment or accessories will be listed separately on the packing list.
2.2 Quick Start
FF
FF
F
olloollo
olloollo
ollo
w this procedure to get yw this procedure to get y
w this procedure to get yw this procedure to get y
w this procedure to get y
our newour new
our newour new
our new
Model 2000 vModel 2000 v
Model 2000 vModel 2000 v
Model 2000 v
acuum gauge up and racuum gauge up and r
acuum gauge up and racuum gauge up and r
acuum gauge up and r
unning.unning.
unning.unning.
unning.
1.1.
1.1.
1.
RemoRemo
RemoRemo
Remo
vv
vv
v
e sensor from protective sensor from protectiv
e sensor from protective sensor from protectiv
e sensor from protectiv
e package packag
e package packag
e packag
ing.ing.
ing.ing.
ing.
2.2.
2.2.
2.
TT
TT
T
ransducer tube maransducer tube ma
ransducer tube maransducer tube ma
ransducer tube ma
y be installed in any be installed in an
y be installed in any be installed in an
y be installed in an
y ory or
y ory or
y or
ientaienta
ientaienta
ienta
tion.tion.
tion.tion.
tion.
Ho Ho
Ho Ho
Ho
ww
ww
w
evev
evev
ev
er if condensaer if condensa
er if condensaer if condensa
er if condensa
tion istion is
tion istion is
tion is
likely to occur,likely to occur,
likely to occur,likely to occur,
likely to occur,
then the por then the por
then the por then the por
then the por
t should be ort should be or
t should be ort should be or
t should be or
ientaienta
ientaienta
ienta
ted doted do
ted doted do
ted do
wnwwnw
wnwwnw
wnw
ard.ard.
ard.ard.
ard.
3.3.
3.3.
3.
When installing 1/8”When installing 1/8”
When installing 1/8”When installing 1/8”
When installing 1/8”
NPT style transducer tube, NPT style transducer tube,
NPT style transducer tube, NPT style transducer tube,
NPT style transducer tube,
use the 7/16” use the 7/16”
use the 7/16” use the 7/16”
use the 7/16”
wrench fla wrench fla
wrench fla wrench fla
wrench fla
ts onts on
ts onts on
ts on
the tube stem.the tube stem.
the tube stem.the tube stem.
the tube stem.
4.4.
4.4.
4.
Connect transducer cable (orange) to controller .Connect transducer cable (orange) to controller .
Connect transducer cable (orange) to controller .Connect transducer cable (orange) to controller .
Connect transducer cable (orange) to controller .
5.5.
5.5.
5.
Connect other end of transducer cable to transducerConnect other end of transducer cable to transducer
Connect other end of transducer cable to transducerConnect other end of transducer cable to transducer
Connect other end of transducer cable to transducer
..
..
.
A finger tight connectionA finger tight connection
A finger tight connectionA finger tight connection
A finger tight connection
is adequais adequa
is adequais adequa
is adequa
te for proper operate for proper opera
te for proper operate for proper opera
te for proper opera
tion.tion.
tion.tion.
tion.
6.6.
6.6.
6.
If yIf y
If yIf y
If y
ou haou ha
ou haou ha
ou ha
vv
vv
v
e computer interface or process control options,e computer interface or process control options,
e computer interface or process control options,e computer interface or process control options,
e computer interface or process control options,
these cables can no these cables can no
these cables can no these cables can no
these cables can no
ww
ww
w
be abe a
be abe a
be a
ttached.ttached.
ttached.ttached.
ttached.
7.7.
7.7.
7.
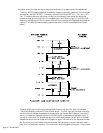
I/O porI/O por
I/O porI/O por
I/O por
t diagt diag
t diagt diag
t diag
ram is gram is g
ram is gram is g
ram is g
iviv
iviv
iv
en in the manual.en in the manual.
en in the manual.en in the manual.
en in the manual.
8.8.
8.8.
8.
Connect the Connect the
Connect the Connect the
Connect the
AA
AA
A
C poC po
C poC po
C po
ww
ww
w
er cord.er cord.
er cord.er cord.
er cord.
The Model 2002 automaThe Model 2002 automa
The Model 2002 automaThe Model 2002 automa
The Model 2002 automa
tically adjusts fortically adjusts for
tically adjusts fortically adjusts for
tically adjusts for
120/240120/240
120/240120/240
120/240
VV
VV
V
AA
AA
A
C 50/60 HzC 50/60 Hz
C 50/60 HzC 50/60 Hz
C 50/60 Hz
..
..
.
9.9.
9.9.
9.
TT
TT
T
urur
urur
ur
n on pon on po
n on pon on po
n on po
ww
ww
w
er ser s
er ser s
er s
witch.witch.
witch.witch.
witch.
Gauge is no Gauge is no
Gauge is no Gauge is no
Gauge is no
w reading pressure in units ofw reading pressure in units of
w reading pressure in units ofw reading pressure in units of
w reading pressure in units of
“T“T
“T“T
“T
oror
oror
or
r”r”
r”r”
r”
(default).(default).
(default).(default).
(default).
10.10.
10.10.
10.
FF
FF
F
or best accuracor best accurac
or best accuracor best accurac
or best accurac
yy
yy
y
,,
,,
,
the gauge should no the gauge should no
the gauge should no the gauge should no
the gauge should no
w be zeroed.w be zeroed.
w be zeroed.w be zeroed.
w be zeroed.
Pump the vPump the v
Pump the vPump the v
Pump the v
acuum systemacuum system
acuum systemacuum system
acuum system
dodo
dodo
do
wn to lown to lo
wn to lown to lo
wn to lo
w 10w 10
w 10w 10
w 10
-6-6
-6-6
-6
TT
TT
T
oror
oror
or
r (if possible).r (if possible).
r (if possible).r (if possible).
r (if possible).
Ideally the gauge should be operaIdeally the gauge should be opera
Ideally the gauge should be operaIdeally the gauge should be opera
Ideally the gauge should be opera
ted in thisted in this
ted in thisted in this
ted in this
condi-condi-
condi-condi-
condi-
tion for one hourtion for one hour
tion for one hourtion for one hour
tion for one hour
..
..
.
11.11.
11.11.
11.
Place the Model 2002 in the Place the Model 2002 in the
Place the Model 2002 in the Place the Model 2002 in the
Place the Model 2002 in the
“CAL“CAL
“CAL“CAL
“CAL
””
””
”
mode b mode b
mode b mode b
mode b
y using the mode sy using the mode s
y using the mode sy using the mode s
y using the mode s
witch.witch.
witch.witch.
witch.
Press the Press the
Press the Press the
Press the
up and doup and do
up and doup and do
up and do
wn arwn ar
wn arwn ar
wn ar
roro
roro
ro
ws simultaneously (“CALws simultaneously (“CAL
ws simultaneously (“CALws simultaneously (“CAL
ws simultaneously (“CAL
””
””
”
light is no light is no
light is no light is no
light is no
w flashing).w flashing).
w flashing).w flashing).
w flashing).
12.12.
12.12.
12.
Press the Press the
Press the Press the
Press the
“ZER“ZER
“ZER“ZER
“ZER
O”O”
O”O”
O”
s s
s s
s
witch once and returwitch once and retur
witch once and returwitch once and retur
witch once and retur
n to the n to the
n to the n to the
n to the
“R“R
“R“R
“R
UN”UN”
UN”UN”
UN”
mode using the mode using the
mode using the mode using the
mode using the
mode smode s
mode smode s
mode s
witch.witch.
witch.witch.
witch.
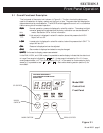
The gauge is now ready for normal operation and the display is a true indication of the system
pressure (P < 8 Torr is N
2
equivalent).