


ELECTRIC COMBI OVEN - REMOVAL AND REPLACEMENT OF PARTS
Page 8 of 68
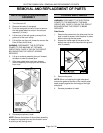
REMOVAL AND REPLACEMENT OF PARTS
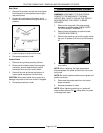
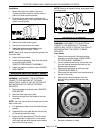
RACK GUIDE/FILTER/EXHAUST
ASSEMBLY
1. Turn the oven off.
2. Remove the racks (if equipped).
3. Push the rack guide to rear of oven to remove
the rack guide tabs from slots in the exhaust
assembly (10 level).
4. Lift the rear of the rack guide up and pull the
guide out of the oven cavity.
5. Lift the filter up, then pull forward to remove the
filter (2 filters on 20 level).
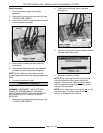
WARNING:
DISCONNECT THE ELECTRICAL
POWER TO THE MACHINE AT THE MAIN
CIRCUIT BOX. PLACE A TAG ON THE CIRCUIT
BOX INDICATING THE CIRCUIT IS BEING
SERVICED.
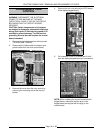
6. Lift up on exhaust assembly then pull forward
at bottom to clear the dowel pins.
7. After lower dowel pins have been cleared,
remove assembly from top pins and remove
from oven.
8. Reverse procedure to install.
NOTE:
Be sure the bottom of the exhaust assembly
is seated on the dowel pins and fan direction arrow
is pointing to left (facing oven).
COVERS AND PANELS
WARNING:
DISCONNECT THE ELECTRICAL
POWER TO THE MACHINE AT THE MAIN
CIRCUIT BOX. PLACE A TAG ON THE CIRCUIT
BOX INDICATING THE CIRCUIT IS BEING
SERVICED.
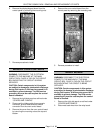
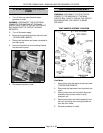
Side Panels
1. Remove the screws from the side panel for the
side in need of access. Hold the panel in place
before removing the last screw.
2. Access the inside edge of the panel at the
bottom rear corner and disconnect the ground
wire (if present).
3. Remove the panel.
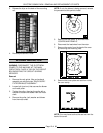
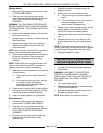
NOTE:
When re-installing the right side panel,
ensure the gasket at the rear of the control panel
seals properly against the front edge of the right
side panel.
4. Reverse procedure to install.