


Epson PowerLite 7900p Projector
12 - Epson PowerLite 7900p Projector 9/04
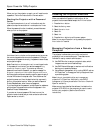
Controlling Multiple Projectors
If you’re using more than one projector, you can control all
the projectors—or just selected ones—by using the projector
ID system with just one remote control. To operate a
projector, you have to set the remote control’s ID to match
that of the projector. Or you can control all of the projectors
simultaneously by setting the remote control’s ID to zero.
Setting the Projector ID
The projector’s default ID is 1. If you need to change it,
follow these steps:
1. Access the projector’s Advanced2 menu, highlight
Projector ID and press Enter.
2. Press the right or left side of the pointer button to
increase or decrease the ID value.
3. Press
Enter to set the value.
4. When done, press
ESC to exit the menu system.
Setting the Remote Control ID
The remote control’s default ID is zero. If you need to change
it, follow these steps:
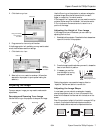
1. Press the
ID button on the remote
control. You see it light up.
2. Press one of the numbered
buttons on the remote
control to select the desired
ID (0 through 9). Select zero
to control all projectors, or
select a number to match the
ID of the projector(s) you
want to operate.
The
ID button’s light shuts off and the new ID is registered.
If you would like to check the remote control’s current ID,
press the
ID button twice. Count the number of flashes; this
number corresponds to the remote control’s ID. If it doesn’t
flash, the ID is set to zero.
Using Password Protection
If you assign a password to the projector, a screen appears
requesting the password whenever you turn on the projector. If
you enter the password incorrectly three times in succession, the
projector’s operation is locked. Disconnect the projector and
reconnect it. If you enter the incorrect password 30 times in a
row, the projector is locked and remains locked until an
authorized Epson servicer can unlock it.
You can also create a user’s logo for the projector, to be
displayed as the startup screen and/or AV/Mute screen.
Unauthorized users cannot turn it off or change it. This
discourages theft and provides a way to identify the projector
should it be stolen.
Additionally, to make sure a borrowed projector is returned,
you can temporarily disable the password for a set period of
time. When that time has elapsed, the password function is
reactivated and you must enter the password before you can use
the projector.
Follow the instructions below to set the password, and then
turn on the password and/or user logo protection.
Note: If you should happen to enable the password before you set
one, and you see the prompt to enter the password, enter the default
password
0000 to proceed.
Setting a Password
1. Press the Freeze button on the remote control for about
5 seconds, until you see the Password Protect menu:
If a password has already been set, you see the Password
Protect Release screen. See “Starting the Projector with a
Password” on page 14.
2. Select
Password and press Enter. You see the message
Change the password?
3. Select Yes and press Enter.
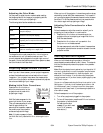
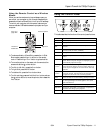
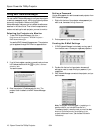
Brightness Control
Brightness Control
High
High
Low
Low
:
Video
Video
Audio
Audio
Setting
Setting
User's Logo
User's Logo
Advanced1
Advanced1
About
About
Reset All
Reset All
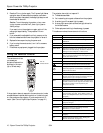
Projector ID
Projector ID
Network
Network
Reset
Reset
Execute
Execute
: 1
: 1
[Menu]: Exit
[Menu]: Exit
Effect
Effect
Advanced2
Advanced2
COM Port
COM Port
BNC Sync Termination
BNC Sync Termination
:
ON
ON
OFF
OFF
:
Set
Set
Set
Set
RS-232C
RS-232C
USB
USB
[ / ]: Select
[ / ]: Select
[ ESC ]: Return
[ ESC ]: Return
[ ]: Set
[ ]: Set
Auto setup
Auto setup
:
OFF
OFF
:
ON
ON
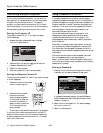
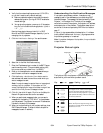
Zero
Password Protect
ON: OFF
Password Timer
Power ON Protect
Set
[ / ] :Select [ ] :Set
Set 9999H
Timer
0H
Time-elapsed
User’s Logo Protect
Passward
ON: OFF
ON: OFF
:
[Menu] :Exit