Epson PowerLite 7900p Projector
9/04 Epson PowerLite 7900p Projector - 15
Setting Up the Network
Connect each projector you want to monitor to your network
and configure it with an appropriate IP address.
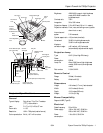
1. Connect the projector to your network using a
commercially available 100baseTX or 10baseT network
cable. Plug the cable into the projector’s Ethernet port.
2. Turn on the projector.
3. Press the
Menu button on the remote control and select
Network from the Advanced2 menu.
4. If your network assigns addresses automatically, turn on
DHCP.
5. If your network does not assign addresses automatically,
turn off
DHCP and enter the projector’s IP Address,
Subnet Mask, and Gateway Address, as needed.
❏ To enter numbers using the remote control, press the
Num button until it lights, then use the numeric
keypad.
❏ To change the network addresses from the projector’s
control panel, press the right and left arrow buttons to
select the part of the address you want to enter, then
use the up and down arrow buttons to increase or
decrease the numeric value.
Note: If you’re a network administrator, you can use the
SNMP option to enter a trap IP address. This lets you receive
trap alerts for the projectors you’re monitoring. If you have
HP OpenView, a plug-in is available to allow you to manage
your projectors in HP OpenView. Check with your dealer or
Epson.
When you finish changing an address in the network menu,
press the
Enter button (on the remote control) or the
Auto/Enter button (on the projector). This stores the
value.
6. When you’re done making all necessary changes, press
ESC
to exit the menu system.
Opening and Closing EMP Monitor
To start EMP Monitor, click Start > Programs or All
Programs > Epson Projector > EMP Monitor
.
If you’ve added the program to the Startup programs folder, it
may already be open. If so, click the icon in the system tray on
the lower-right corner of your screen to display the EMP
Monitor window:
To close EMP Monitor, right-click the program icon shown
above, then select
Exit.
To network port
Ethernet port
Brightness Control
High
Low
:
Video
Audio
Setting
User's Logo
Advanced1
About
Reset All
Projector ID
Network
Reset
Execute
: 1
[Menu]: Exit
[ ]: Enter
[ ]: Select
Effect
Advanced2
COM Port
BNC Sync Termination
:
ON
OFF
:
Set
Set
RS-232C
USB
Auto setup
ON
OFF
:
Select
Network
Num button
Zero
Increase or
decrease
the value
Select the part of the
address to change
Click here to start EMP Monitor