


SELECT
ENTER
15
SELECT
ENTER
ACTUAL SET
MAIN xxxxF 0500F
FLEX xxxxF 0500F
SETUP EXIT
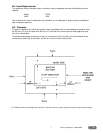
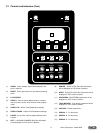
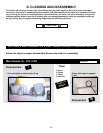
C.4 Control Operation
Left WHOPPR 01:50
Center CHICKN 03:45
Right CHICKN 03:45
MAIN XXXX
F FLX XXXXF
1
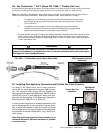
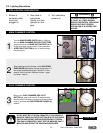
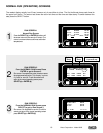
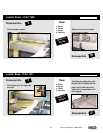
Turn Main Power Switch on.
Copyright screen will illuminate for
several seconds showing software
revision number (2.15 at time of
printing) followed by the run screen
Broiler should be in HIGH GAS (4”
W.C.). Light the broiler following the
lighting procedures.
2
Calibrate by setting the main and flex
temperatures to 500°F. Push and hold the
SELECT (a) button for 5 seconds. LCD will
show TEMP SET function.
ACTUAL SET
MAIN xxxxF 0500F
FLEX xxxxF 0500F
SETUP EXIT
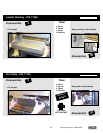
3
Use the SELECT (a) button to move the cur-
sor. Use the up or down arrows to change the
values. When both main and flex “set” temper-
atures read 500°F, press
ENTER (b) twice
to save.
SELECT
ENTER
ACTUAL SET
MAIN 0750F 0750F
FLEX 0450F 0450F
SETUP EXIT
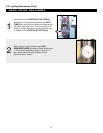
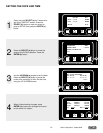
4
Allow the broiler 30 minutes to warm up. After
warm up, press the
SELECT (a) button to
move the cursor to the set temperature. Use
the up and down arrows to change the value
so the set temperature is 20°F
HIGHER than
the actual temperature. Use the ENTER (b)
button to save. NOTE: THIS IS ONLY AN
EXAMPLE SHOWN;YOUR READ OUT WILL
BE DIFFERENT!
INITIAL SET-UP AND CALIBRATION
a
a
b
a
Belt
Product
Selection
Preset
Cook
Time
Actual Broiler
Temperatures
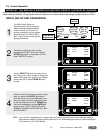
IMPORTANT: THIS BROILER IS SHIPPED WITH FACTORY PRESETS THAT MUST BE CHANGED.
If this is the initial start-up for your broiler, ALL control settings must be made according to BURGER KING® specifications. Follow the
steps outlined for calibration, changing preset times and setting the flex chamber element heat settings to properly set up this broiler.
b
2x
Nieco Corporation - Model 9025
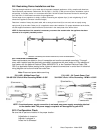
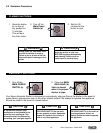
NOTE: If your broiler is equipped with a catalyst; be sure to verify that your broiler enters high gas mode (4”
Gas pressure reading on gauge) when under load. If not, follow these procedures to raise the set point
of the broiler by 10°F; then recheck.