


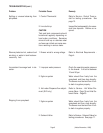
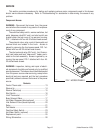

Page 5
PLUMBING REQUIREMENTS
This brewer must be connected to a cold water system with operating pressure greater than 10 psi from a
1/2” or larger supply line. A shut-off valve should be installed in the line before the brewer. Install a regulator in
the line when pressure is greater than 90 psi to reduce it to 50 psi. The water inlet fitting is 1/4" flare.
NOTE - Bunn-O-Matic recommends 1/4" copper tubing for installations of less than 25 feet from the 1/2" or larger
supply line. A tight coil of copper tubing in the water line will facilitate moving the brewer to clean the counter
top. Bunn-O-Matic does not recommend the use of a saddle valve to install the brewer. The size and shape of the
hole made in the supply line by this type of device may restrict water flow.
Plumbing Hook-Up
1. Make certain that the 1/4" female flare fitting on the short tube from the outlet of the water strainer is securely
attached to the male bulkhead fitting on the brewer.
2. Flush the water line and securely attach it to the 1/4" flare fitting on the strainer.
3. Turn on the water supply.
INITIAL SETUP
CAUTION - The brewer must be disconnected from the power source throughout the initial setup, except when
specified in the instructions.
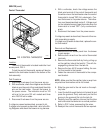
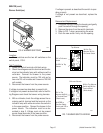
1. Remove the front panel from the brewer.
2. Rotate the control thermostat knob fully counterclockwise to the "OFF" position and replace the panel.
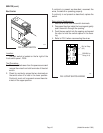
3. Insert an empty funnel into the funnel rails.
4. Place a decanter containing a small amount of water on the warmer beneath the brew funnel.
5. Connect the brewer to the power source and place the On/Lower switch in the upper position.
6. Momentarily press the start switch. Approximately 64 ounces of water will flow into the brew tank. To fill the
tank, it will be necessary to start two more brew cycles. Place the On/Lower switch in the lower position
when water starts flowing form the funnel into the decanter.
7. Disconnect the brewer from the power source and remove the front panel.
8. Rotate the control thermostat knob fully clockwise to the "ON" position and replace the panel.
9. Connect the brewer to the power source and wait for the water in the tank to heat to the proper temperature.
Some water will drip from the funnel during this time; this is due to expansion and should not occur thereaf-
ter.
10. Place an empty decanter under the funnel.
11. Place the On/Lower switch in the upper position and momentarily press the start switch. Empty the decanter
after water has stopped flowing from the funnel and return it to the warmer.
12. Allow the water in the tank to reheat to the proper temperature.
13. Momentarily press the start switch. Check the water volume in the decanter after water has stopped flowing
from the funnel. It should be 64 ounces.
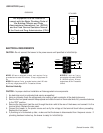
14. If not, disconnect the brewer from the power source and remove the top lid.
15. Add or remove washers to the float on the level switch as required and replace the top lid. Adding washers
increases the volume, removing washers decreases it.
16. Repeat steps 12-15 until the proper water volume is achieved.
17A. Model SL:
The brewer is now ready for use in accordance with the coffee brewing instructions on page 6.
17B. Model SLF:
Momentarily press the hot water dispense switch a few times to clear any air from the dispense lines.
18. Allow the tank to fully reheat.
(Revised November 1999)
This equipment must be installed to comply with the Basic Plumbing Code of the Build-
ing Officials and Code Administrators International, Inc. (BOCA) and the Food Service
Sanitation Manual of the Food and Drug Administration (FDA).