


8
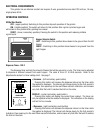
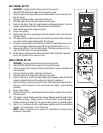
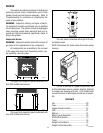
COFFEE GRINDING
1. Select (either left or right hopper) with selector switch and visually inspect the desired hopper for an ample
supply of whole bean coffee.
2. Place a paper filter into the brew funnel. The filter must not be folded-over or tilted to one side.
3. Insert the funnel into the funnel rails and push until it stops.
4. Momentarily press off/on/start switch to the "START" lower position and release. The grinding action will stop
automatically after the preset amount of ground coffee is dispensed into the funnel.
5. Remove the funnel from the grinder and level the bed of grounds by gently shaking.
6. The loaded funnel is now ready for use in any commercial drip coffee brewer according to the manufacturer’s
instructions.
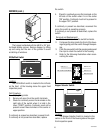
CLEANING
EXTERIOR SURFACES
The use of a damp cloth rinsed in any mild, nonabrasive, liquid detergent is recommended for cleaning all
surfaces on Bunn-O-Matic equipment. Care should be taken not to scratch the hopper or windows with any
abrasive material. Regular cleaning will keep your grinder looking new for years.
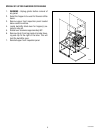
GRIND CHAMBER
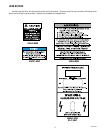
1. WARNING - Unplug grinder before removal of any panel or grind chamber housing parts.
2. Empty all beans from both hoppers.
3. Remove upper front inspection panel located below control switches.
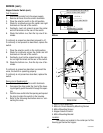
4. Remove the two nuts holding dispense chute cover. Carefully wipe inside surface of dispense chute and
cover with a dry clean cloth.
5. Select a grind chamber to clean first. Each grind chamber should be disassembled, cleaned and reassembled
before cleaning the opposite side.
6. Remove the two screws holding front cover to burr housing. Carefully remove burr housing front cover.
Clean the inside surface with a dry stiff nonmetallic bristle brush and wipe with a dry clean cloth.
7. Carefully remove rotor button, rotor, brass bushing and steel washer from grinder. Clean all parts with a dry
stiff nonmetallic bristle brush and wipe with a dry clean cloth.
8. Clean the grind chamber with a dry stiff nonmetallic bristle brush and wipe with a dry clean cloth. Use a small
screw driver to dislodge coffee packed in the discharge chute at the base of the grind chamber and wipe
clean. Use care not to damage dechaffer blade.
9. Reinstall steel washer, brass bushing (flanged end first), rotor, rotor button and front cover to burr housing.
10. Repeat steps 6 through 9 on remaining grind chamber.
11. Reinstall dispense chute cover.
12. Reinstall upper front inspection panel.
13. Refer to adjustments section below to vary the grind dispensed from each grind chamber.
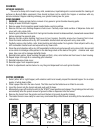
STEP #1
STEP #2
STEP #3
STEP #4
STEP #5
P931
P932 P933
P934
P935
10854 030300