


9
ADJUSTMENTS
The grind can be set from fine to very coarse. The grind may be adjusted for use in most commercial coffee
brewers. The following procedures should be used to make adjustments.
NOTE - On DG-2 grinders a change in the burr adjustment will also change the amount dispensed. Any adjust-
ment to the burrs should be followed by an adjustment of the timer,
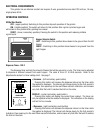
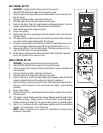
Burr Adjustment
1. Unplug the grinder and empty all beans from the hopper(s).
2. Plug-in the grinder, place funnel with filter into the funnel rails. Momentarily
press the off/on/start switch to the “START” (lower) position (with desired
hopper selected) and release, run a few grind cycles until all of the coffee in the
grind chamber is dispensed.
3. Remove the upper front inspection panel.
4. Loosen the burr adjustment screw from its locked position.
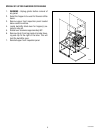
5. Hand loosen the adjustment locking nut around the screw approximately one
turn.
6. Make sure funnel with filter is still in place in the funnel rails. Press the off/on/start switch to the “START”
(lower) position and release,slowly turn the adjusting screw in a clockwise direction until a metallic whine is
heard due to the rubbing of the grinding burrs. (It may be necessary to start more than one grind cycle to
obtain this sound.)
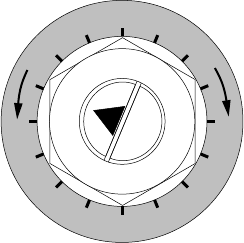
7. Make a mark with a pen on the decal to note the position of the arrow on the grind adjustment screw.
8. The following settings approximately correspond to the CBC recognized grinds. All are referenced from the
arrow position marked in step #7.
FINE GRIND: Rotate the adjusting screw 7 hash marks in a counterclockwise direction.
DRIP GRIND: Rotate the adjusting screw 8 hash marks in a counterclockwise direction.
REGULAR (COARSE) GRIND: Rotate the adjusting screw 12 hash marks in a counterclockwise direction.
NOTE: Exact adjustment will vary according to bean roast or added flavoring.
9. Hold the adjusting screw in its set position with a screwdriver while tightening the lock nut to a snug position
by hand. The lock nut should now be tight against the burr housing front cover.
10. Repeat steps 1 thru 9 for remaining hopper if desired.
11. Reinstall upper front inspection panel.
Timer Adjustment - DG-2
1. Unplug the grinder and remove the lower front inspection panel.
2. Determine the grind setting. (The factory setting is drip, to determine other settings, refer to the previous
section.)
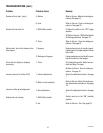
3. Use the instructions below to find the approximate timer setting for the grind and amount of coffee desired.
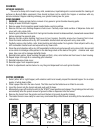
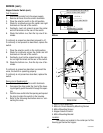
4. Plug-in grinder and select (left or right) desired hopper. Momentarily press the “DISPLAY” (center) button.
The display will indicate the current timer setting and will allow adjustment. Press the “+” or “-” buttons as
required to obtain the desired grind time. The interval will change slowly for the first second’s indication,
then speed-up for the next fifteen second’s indication, and increase very fast after that until it reaches the
limit on the scale. Set the timer for the desired amount of coffee to be ground.
5. Verify the setting by weighing a few samples. Use the chart on page 10 as an approximate guide only.
P581
C
O
A
R
S
E
-
F
I
N
E
B
U
N
N
P581
10854 030300