


26
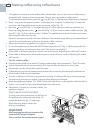
Rinsing
This function enables you to obtain hotter coffee. Proceed as follows:
When you turn the appliance on, if you want to make a small cup of coffee (less than 60 cc),
preheat the cup by rinsing it with hot water.
If on the other hand more than 2/3 minutes have passed since the last coffee was made, before
requesting another coffee, you must preheat the brewing unit by:
1
first pressing the icon (B2) to enter the menu
2
then the icons (B7) and (B8) to select the “RINSING” function.
3
press the OK icon (B9). “RINSING... PLEASE CONFIRM” is displayed.
4
press the OK icon (B9) again. Deliver the water into the underlying drip tray or alternatively use
this water to fill (and then empty) the cup to be used for the coffee to preheat it.
Changing the length of time the appliance remains on
The appliance is set by default to go off automatically 30 minutes after the last coffee has been
made. To change this interval (max. 120 min), proceed as follows:
1
Press the icon (B2) to enter the menu and then the icons (B7) and (B8) until
“SHUT-OFF TIME” is displayed.
2
Press the OK icon (B9) to confirm.
3
Press the icons (B7) and (B8) to set the time after which the appliance will go off
(after 1/2 hour, 1 hour, 2 hours).
4
Press the OK icon (B9) to confirm.
5
Press the ESC icon (B6) to exit.
Setting the clock
1
Press the icon (B2) to enter the menu and then the icons (B7) and (B8) until “SET CLOCK”
is displayed.
2
Press the OK icon (B9).
3
Use the icons (B7) and (B8) to set the hour, then press the OK icon (B9) to confirm.
4
Use the icons (B7) and (B8) to set the minutes, then press the OK icon (B9) to confirm.
5
Press the ESC icon (B6) to exit the menu.
Setting auto-start time
This function programmes the time the machine will come on automatically.
1
Make sure the clock on the appliance has been set.
2
Press the icon (B2) to enter the menu and then the icons (B7) and (B8) until
“START TIME” is displayed.
3
Press the OK icon (B9).
4
Use the icons (B7) and (B8) to set the auto-start time, then press the OK icon (B9) to
confirm.
5
Use the icons (B7) and (B8) to set the minutes, then press the OK icon (B9) to confirm.
6
Press the icons (B7) and (B8) to activate the auto-start function until “AUTO START” is
displayed.
7
Press the OK icon (B9) to confirm. The symbol appears on the display.
8
Press the ESC icon (B6) to exit the menu.
9
To deactivate the automatic start-up function, press the (B2) icon, then press the (B7)
and (B8) icons until the appliance displays the message “AUTO START-UP”. Press the OK (B9) icon.
“CONFIRM” will appear on the display. Press “ESC” to deactivate and the
symbol will disappear.
Changing and setting menu parameters
EN