


Impinger I -–1000 Series Service Manual - Domestic
36
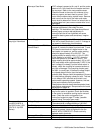
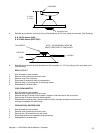
BURNER ASSEMBLY
1. Shut off power at main breaker.
2. Shut off gas supply.
3. Remove control panel top and front panel.
4. Remove gas control valve (See "GAS CONTROL VALVE")
5. Disconnect pilot tube.
6. Remove thermostat or solenoid valve.
7. Remove four (4) phillips screws that secure the burner backing plate.
8. Remove burner assembly from housing, the main and pilot orifice, flame target, pilot
shield (main and extension), flame sensor, and burner ignitor can now be changed or serviced as
needed.
9. Reassemble in reverse order.
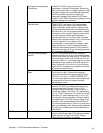
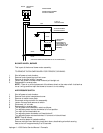
GAS CONTROL VALVE
1. Shut off power at main breaker.
2. Shut off gas supply.
3. Remove control panel top and front cover.
4. Disconnect the gas piping from the back of the unit.
5. Remove the four-(4) screws from the incoming nipple mounting bracket.
6. Remove incoming nipple.
7. Remove pilot tube assembly from control valve.
8. Disconnect pipe union just above control valve.
9. Disconnect wiring from control valve making note of wire numbers and location.
10. Reassemble in reverse order - after assembly is complete be sure to check manifold pressure
(3.5" W.C. NAT Gas/10" W.C. LP) and adjust if necessary. (See Section
"MANIFOLD PRESSURE-ADJUSTMENT")
NOTE: Check all gas line fittings for leaks after installation.
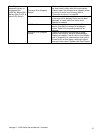
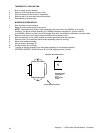
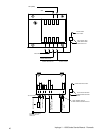
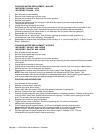
FRONT VIEW
MANIFOLD ADJUSTMENT
SCREW LOCATED UNDER
COVER SCREW
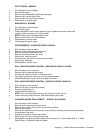
TOP VIEW
PILOT
LINE
CONNECTION
MANIFOLD PRESSURE
ADJUSTMENT CONNECTION
MANIFOLD ADJUSTMENT
SCREW LOCATED UNDER
COVER SCREW