


Impinger I -–1000 Series Service Manual - Domestic
42
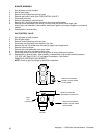
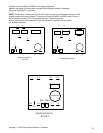
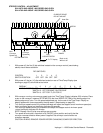
PILOT ORIFICE - BURNER
1. Shut off power at main breaker.
2. Shut off gas supply.
3. Remove burner assembly (see Burner Assembly).
4. Remove pilot line from pilot orifice.
5. Remove pilot orifice from burner igniter.
6. Reassemble in reverse order.
MAIN ORIFICE - BURNER
1. Shut off power at main breaker.
2. Shut off gas supply.
3. Unbolt temperature control valve assembly (see Temperature Control Valve) and
carefully rotate to access main orifice bracket.
NOTE: Be sure not to damage capillary tube.
4. Remove main orifice from orifice bracket.
5. Reassemble in reverse order.
6. Check all gas fittings for leaks.
POTENTIOMETER - CONVEYOR SPEED CONTROL
1. Shut off power at main breaker.
2. Remove control panel top and front panel.
3. Remove conveyor speed control dial.
4. Remove mounting nut from pot. shaft.
5. Remove pot. from front panel.
6. Disconnect pot. wiring from conveyor control board.
7. Remove pot. assembly.
8. Reassemble in reverse order.
DIAL, CONVEYOR SPEED CONTROL (NON-DIGITAL DISPLAY OVENS)
1. Shut off power at main breakers.
2. Remove dial by loosening set screws.
3. Set new dial indicator to "000" in window and lock.
4. Turn speed control pot. shaft to its minimum speed position.
5. Slide dial assembly onto pot. shaft and tighten set screw.
DIAL, CONVEYOR SPEED CONTROL (OVEN WITH DIGITAL DISPLAY)
1. Shut off power at main breaker.
2. Remove old dial by loosening set screw.
3. Remove shaft locking nut.
4. Install new shaft locking nut.
NOTE: This is a friction type locking nut do not try to trim this nut to fit.
5. Install new dial by sliding over pot. shaft and tightening set screw.
CONVEYOR MOTOR REPLACEMENT - BODINE (SN 100-4389)
1. Shut off power at main breaker.
2. Remove control panel top and front panel.
3. Remove the conveyor drive chain from the motor sprocket.
4. Remove chain guard.
5. Remove the sprocket from the conveyor motor shaft by loosening the set screws and sliding
the sprocket off the shaft.
6. Unplug the conveyor motor wiring harness.
7. Remove the four (4) mounting bolts and nuts.
8. Reassemble in reverse order and calibrate the conveyor D. C. control board (See D. C. Motor
Control Board - Calibration, Bodine System).